Working with design templates
- Introduction to templates
- Dynamic Web Templates (DWT)
- ASP.NET Masterpages
Introduction to Templates
Suppose you have been given a design concept by one of the creative team
within your organisation. If it is your responsibility to realise the design in
XHTML you will want to make sure that each page matches the design exactly.
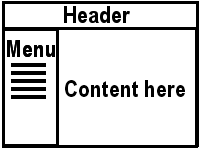 The
diagram to the right show a simple page structure, commonly used in websites. It
is usual for the structure to be maintained over all (or most) of the pages in
the site. This means that the website developer needs to have the same
basic XHTML for every page in the site. The only differences will be in the page
title and the content section. If each page was edited completely independently
of the others there is a possibility that there will be minor differences
between the pages.
Templates get round this problem by allowing the developer
to create the basic structure of the page as a design template. All pages are
then created based on the the template. The only parts of the page which can be
altered will be identified as editable regions in the template. That way each
page has a consistent structure. If the template is edited the changes will be
applied across all the pages which are linked to it.
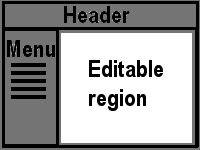 The
diagram on the right shows this in action. The editable region is the only part
available to the developer once a page has been created from the template.
There are two main approaches to templated design. One builds the entire
template into each page and the other uses a link to the template and only
includes the content in the page. The choice of approach is made by the software
tool you are using. Expression Web and Dreamweaver use the former approach as
this is the most appropriate for static pages. Visual Web Developer (for ASP.NET
pages) uses the latter approach as the pages are built dynamically when the
pages are requested.
Dynamic Web Templates
Microsoft FrontPage makes use of Dynamic Web Templates (DWT) to assist the
development of consistent websites. DWT's have been adopted by Expression Web
and are used in the same way. Dreamweaver also uses templates and uses the same
acronym and file extension (.DWT). However, Dreamweaver .DWT files are not
identical to Microsoft .DWT files although they are very similar. Expression Web
can make use of a Dreamweaver web template file and will convert it into the
Microsoft Dynamic Web Template format automatically.
To create a DWT file you use the File|New...|Page... menu command and select
Dynamic WebTemplate from the option list. The resulting code is created.
<!DOCTYPE html PUBLIC "-//W3C//DTD XHTML 1.0 Strict//EN"
    "http://www.w3.org/TR/xhtml1/DTD/xhtml1-strict.dtd">
<html dir="ltr" xmlns="http://www.w3.org/1999/xhtml">

<head>
<meta http-equiv="Content-Type"
      content="text/html; charset=utf-8" />
<!-- #BeginEditable "doctitle" -->
<title>Untitled 1</title>
<!-- #EndEditable -->
</head>

<body>

<!-- #BeginEditable "body" -->
<div>
</div>
<!-- #EndEditable -->

</body>

</html>
Note that there are two editable regions defined in this empty template. One
corresponds to the position of the title in the the <head>
section of the page and the other corresponds to the content of the page. Our
first job is to construct the basic page structure around the editable regions.
This will usually involve adding a style sheet link, metadata and the <div>
structure for the web page. The following code shows this for our classic three
section web page. Note: the style sheet is placed before the editable section
for the title. This is so that when we create a web page from the template if we
want we can add in a style sheet for the page which can override style in the
template.
<!DOCTYPE html PUBLIC "-//W3C//DTD XHTML 1.0 Strict//EN"
    "http://www.w3.org/TR/xhtml1/DTD/xhtml1-strict.dtd">
<html dir="ltr" xmlns="http://www.w3.org/1999/xhtml">
<head>
<meta http-equiv="Content-Type"
      content="text/html; charset=utf-8" />
<link href="Stylesheet.css" rel="stylesheet" type="text/css" />
<!-- #BeginEditable "doctitle" -->
<title>Untitled 1</title>
<!-- #EndEditable -->
</head>
<body>
<!-- #BeginEditable "body" -->

<!-- #EndEditable -->
</body>
</html>
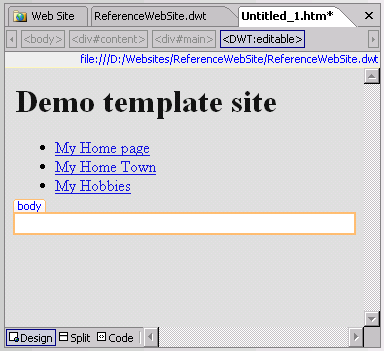 If
we save the template and create a page based on it using the New|Create from
Dynamic Web Template menu option we get the following when opened in Design
View. The page is greyed out apart from the body section which can be edited.
We don't have access to the doctitle editable section in design view as it
is in the <head> section of the document. If we want to change the title of our
new page we can switch to Code View and type it in directly. We are also free to
add and page specific metadata in this section too.
Multiple Editable Regions
If we have a page design with multiple sections it makes sense to build the
sections into the structure of the page and have them in the template. That way
we can control the structure of the page in one place rather than having to keep
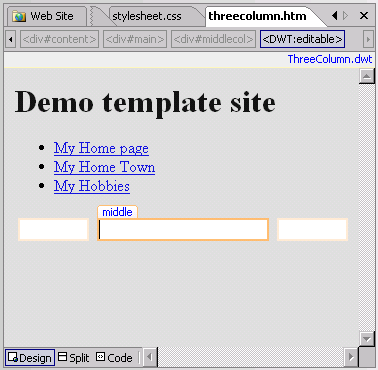
track of the section code in each page. The diagram below shows the template for
a page with three columns. Note that the page will not appear in columns until
the style sheet is attached and edited to create the desired layout.
    <li><a href="hobbies.htm">My Hobbies</a></li>
    </ul>
  </div>
  <div id="main">
    <div id="leftcol">
<!-- #BeginEditable "left" -->
<!-- #EndEditable -->
    </div>
    <div id="middlecol">
<!-- #BeginEditable "middle" -->
<!-- #EndEditable -->
    </div>
    <div id="rightcol">
<!-- #BeginEditable "right" -->
<!-- #EndEditable -->
    </div>
  </div>
</div>
</body>
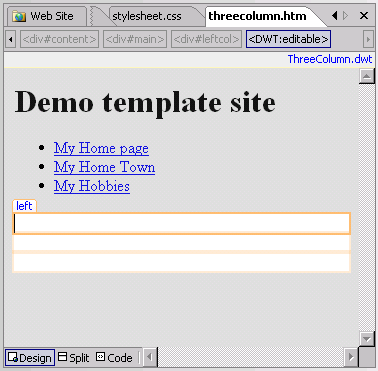 The
view without the style sheet is shown here.
 The
view with the style sheet is shown here.
ASP.NET and MasterPages
The alternative method of providing template based design is used in ASP.NET.
The term template is replaced by the composite word Master Pages. Expression
web can be used to create a Master Page based ASP.NET web application, however,
it is not capable of performing more than basic web editing, unlike Visual Web
Developer which provides facilities for building, developing and testing ASP.NET
web applications. To create a Master Page just choose New|Master Page from the
menu. You will end up with the following code:
<!DOCTYPE html PUBLIC "-//W3C//DTD XHTML 1.0 Strict//EN"
          "http://www.w3.org/TR/xhtml1/DTD/xhtml1-strict.dtd">
<%@ Master Language="C#" %>
<html dir="ltr" xmlns="http://www.w3.org/1999/xhtml">
<head runat="server">
<meta http-equiv="Content-Type"
      content="text/html; charset=utf-8" />
<title>Untitled 1</title>
<asp:ContentPlaceHolder id="head" runat="server">
</asp:ContentPlaceHolder>
</head>
<body>
<form id="form1" runat="server">
<asp:ContentPlaceHolder id="ContentPlaceHolder1" runat="server">
</asp:ContentPlaceHolder>
</form>
</body>
</html>
You will see the usual XHTML code, but there are added elements, fore example,
all ASP.NET web pages have a form element to contain the entire page.
As web page
designers we don't need to concern ourselves too much with the function of these
elements, however, we do need to know how to make use of them. There is a
similarity between the Dynamic Web Template and a Master Page in that they both
have markers for replaceable content. In the case of a Master Page this is done
using an <asp:ContentPlaceHolder> element. The big difference with Master Pages
occurs once we create a new web page (in ASP.NET they are referred to as web
forms).
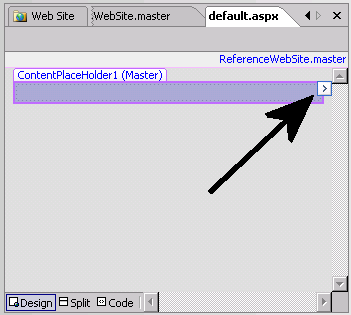 The
screenshot shows the page resulting from creating a new web
page from a Master Page.
Note: the editable region is greyed out. To enable this area we need to click
the Smart Tag, highlighted by an arrow, and a drop down menu will appear with a
Create Custom Content option. One you do this the label changes from (Master)
to (Custom) and you can edit the content.
The code below shows the page code before and after the Create Custom Content
option has been selected. Notice that neither version has any side of XHTML
code. The page simple provides a link to the Master Page. The .NET web server
merges the two together when a user requests the page from the website. You can
change the title of the web page (in code view) by directly editing the title
attribute in the code, however if you highlight the word Page you can edit its
attributes in the Tag Properties Task Pane.
Before:
<%@ Page masterpagefile="ReferenceWebSite.master"
         language="C#" title="Untitled 1" %>
After:
<%@ Page masterpagefile="ReferenceWebSite.master"
         language="C#" title="Untitled 1" %>
<asp:Content id="Content1" runat="server"
             contentplaceholderid="ContentPlaceHolder1">

</asp:Content>
Note:
ASP.NET web forms have the extension .aspx to distinguish them from plain static
web pages. The code below shows the Master Page version of the Dynamic Web
Template demonstration page above.
<%@ Master Language="C#" %>
<html dir="ltr" xmlns="http://www.w3.org/1999/xhtml">
<head runat="server">
<meta http-equiv="Content-Type"
      content="text/html; charset=utf-8" />
<title>Untitled 1</title>
<meta name="author" content="John P Scott" />
<asp:ContentPlaceHolder id="head" runat="server">
</asp:ContentPlaceHolder>
</head>
<body>
<form id="form1" runat="server">
  <div id="content">
    <div id="header">
      <h1>Demo template site</h1>
    </div>
    <div id="menu">
      <ul>
        <li><a href="default.htm">My Home page</a></li>
        <li><a href="home.htm">My Home Town</a></li>
        <li><a href="hobbies.htm">My Hobbies</a></li>
      </ul>
    </div>
    <div id="main">
      <asp:ContentPlaceHolder id="ContentPlaceHolder1"
                              runat="server">
      </asp:ContentPlaceHolder>
    </div>
  </div>
</form>
</body>
</html>