Deploying applications to third party hosted sites
Visual Web Developer (VWD), in either the Express edition or the Visual Studio
edition, provides a powerful intuitive and flexible environment for the
development of web applications. It's strong linkage to SQL Express serves to
enhance that power, however, it also generates confusion when the application
needs to be deployed into a live web server environment.
Before looking a specific steps needed to deploy on a third party hosted system
we will look at the underlying concepts and constraints of an application
straight out of VWD.
The web application folder
VWD's packaging of a web application thorugh a single folder with special
ASP.NET sub folders for things such as third party library code and databases on
the surface seems to imply that publication of the appplication is as easy as
copying the folder onto a suitable folder on the server. This is possible, but
you need to be aware of the system requirements before making this assumption.
For publication using folder copying the server environment needs to be
configured in the same way as the development environment, and except in cases
where a server is specifically configured for compatibility with VWD the
likelihood is that some further work is required to make an application work.
Activating an application
The development environment makes use of the built in Web Server for testing of
the application, however, a live test or production server will use IIS for
hosting the application. Before an ASP.NET web application can run on IIS its
folder needs to be marked as an application. This may need the web server
administrator to get involved, or in some cases (usually on test servers) this
can be done through an on-line configuration tool.
SQL Express and the VWD environment
If you make use of the built in App_Data folder for a web application you can
develop a data driven site using a file based MS SQL database. The installation
of VWD and SQL Express sets up the environment so that the application has
permissions to access the database and the application's web.config file will
usually maintain a copy of the connection string needed to access the database.
A typical connection string definition in web.config would look like:
<connectionStrings>
 <add name="ConnectionString"
   connectionString=
               "Data Source=.\SQLEXPRESS;
                AttachDbFilename=|DataDirectory|\Database.mdf;
                Integrated Security=True;
                User Instance=True"
   providerName="System.Data.SqlClient"/>
</connectionStrings>
Note: the actual connectionString attribute would be a single string on one
line.
The built in security provider and its missing configuration
When you use the ASP.NET Configuration page for your application to setup
security it typically creates a database in the App_Data folder called
aspnetdb.mdf, along with its associated lock file. However, if you look in your
application's web.config file you will see no reference to it.
The reason for this is that the default installation of VWD creates a set of
default configuration files with entries for default values. The wizard driven
security setup just uses default values and so the configuration entries are
already available in the default configuration files. The application's
web.config file only needs to specify exceptions to the defaults and so there is
no entry for the security database.
Publishing a web application
To publish a web application you must handle all the above issues. A summary of
the processes involved is:
The following sections show the stages involved in configuring a database drive
web application on a third party IIS hosted system using the Helm control panel
interface. The concepts are transferrable, though the details may vary from one
web hosting provider to another.
Setup the application folder
Pre-requisites for deployment of a data driven ASP.NET application are that you
must have a Microsoft IIS based hosting package with ASP.NET enabled at least
one virtual folder available and a minimum of one available MSSQL database. We
will assume this is the case, or that you have upgraded to include these
resources.
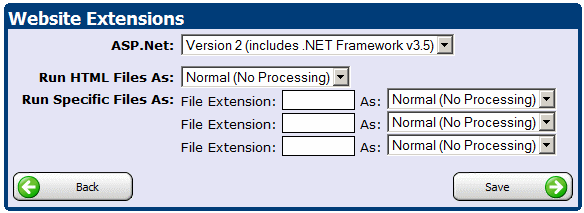
First make sure ASP.NET is activated in the Domains | Website Settings section
of your control panel.
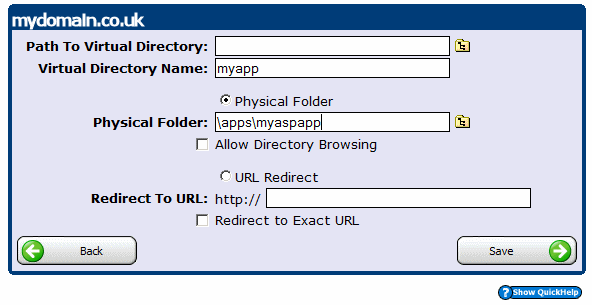
You now need to create a Virtual Directory for your application. This in effect
activates the directory as a web application. Note: you won't need to do this if
your web application is the root of your entire web space. The important
elements are to specify a virtual directory name and a physical folder path.
Assume your domain name for your website is
www.mydomain.co.uk. and you want your web application to be accessed
using the url: www.mydomain.com/myapp.
Assume your application will be uploaded into the folder \webroot\apps\myaspapp
on your web account. The Virtual folder settings will be:
- Virtual Directory Name - \myapp
- Physical folder - \apps\myaspapp
Your folder is now able to deliver an .aspx web page. You can upload an .aspx
file into the folder and test it.
Create database(s)
If you have a database for delivering content (e.g. a products listing) you will
need a corresponding database hosted by your provider. If you use a security
database (aspnetdb.mdf) you need to provide the information held in that
database. It is possible to provide bothe sets of data (company data and
security data in the same physical database on the remote system, but there are
strong arguments for keeping them separate.
If you don't want to pay for having 2 SQL databases on your account you can
create a single physical database and use the information in the next session to
copy the company data and the security data into a single database.
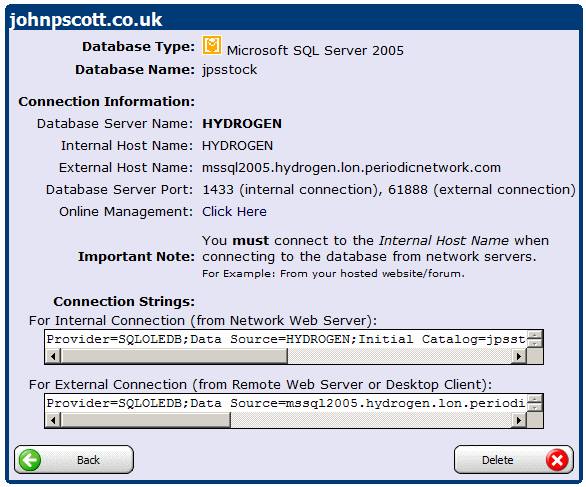
In the Helm control panel for your domain you can use the Database Manager icon
to access the Databases page and add a new database (or two). This will create
empty databases. At the same time you must create a database user with password
for each database by selecting the database(s) and adding a new user on the
Update Database page. This page also provides a link for you to check the
connection strings you will need to access your database. You must copy the
connection information to your local computer for future reference. There may be
a single connection string which applies for connections to the database under
all circumstances. However, some SQL databases need to use a different
connection string from the one you use when accessing the database from a remote
site when you are accessing the database from an application running from the
same hosting company.
For example, if you want to access your database from a remote system (i.e. not
hosted with your hosting company) the connection string may be:
Data Source=mssql2005.servername.hostingcompany.com,61888;
Initial Catalog=dbname;
User Id=MyDatabaseUser;
Password=MyDatabaseUserPassword;
Whereas, when you host your website with the same SQL server hosting company the
connection string may be:
Data Source=servername;
Initial Catalog=dbname;
User Id=MyDatabaseUser;
Password=MyDatabaseUserPassword;
Copy the database(s)
We now have one or more blank databases ready to accept data from the
development environment. By far the simplest mechanism is to install the
Microsoft SQL Server Database Publishing Wizard, which is a free download. The
software integrates with VWD or Visual Studio and allows you to copy the table
structure, data and other vital information from your local machine onto the
remote database.
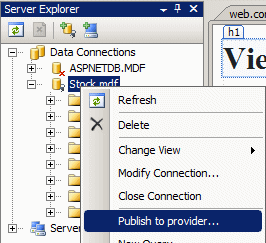
With your project open in VWD go to the Server Explorer and right click on your
database. If you have more than one database you can repeat this process for
each of them.
The context menu should have a 'Publish to provider ...' entry.
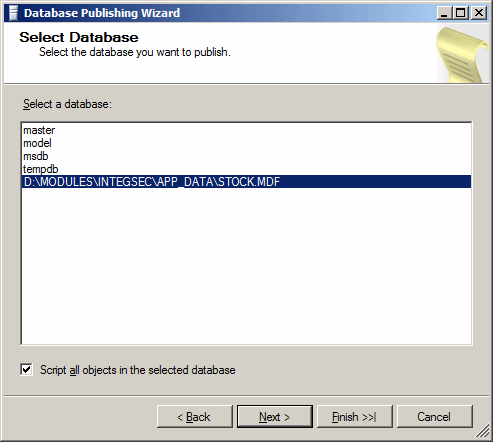
Select this and the Database Publishing Wizard will open. Make sure your
database is selected and press Next.
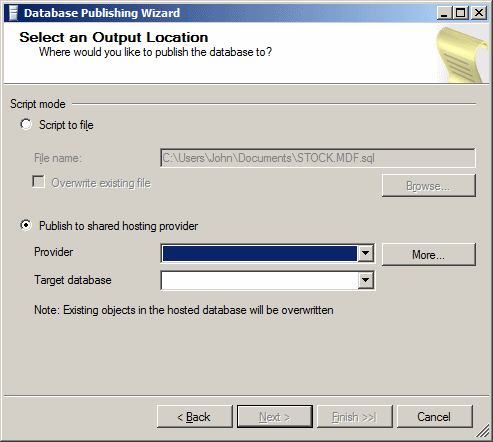
The Select an Output Location window will appear. If this is the first
time you have published a database you will need to set up the publishing
location. Select the 'Publish to shared hosting provider' radio button and Press
the More... button to configure the publishing location.
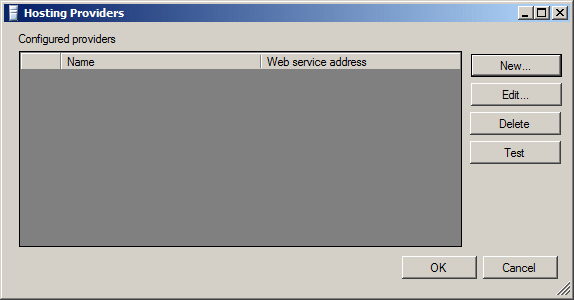
A hosting providers configuration window will appear. Click the New button to
configure access to your hosting comany's SQL publishing web service. (If you
hosting company does not support this approach your next best bet is to use SQL
Server Management Studio to perform the migration.
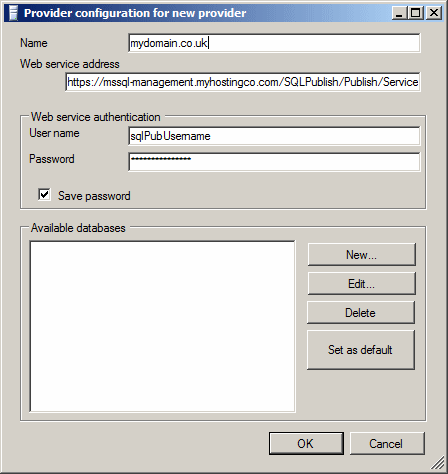
When you click the New... button the Provider configuration for new provider
window appears. You hosting company will provide the Web Service Address,
username and password for you to access this service. On the control panel
window for the database, as shown above, the provider has included a link for
Online management which provides connection information. The first stage is to
enter these details.
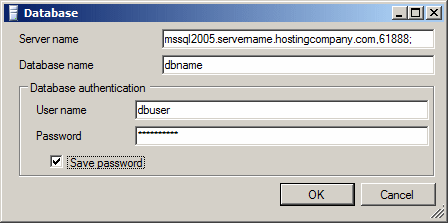
You may then provide details of each database you will want to publish to. Press
the New... button and the Database window appears. Here you should fill in the
elements from your Remote connection string and press OK:
The provider configuration will list your ne database connection, so you can
press OK.
The Hosting providers window will show your new publishing connection and you
can click the Test button to verify correct configuration. Clcik OK and the
Select an Output Location will list your Target database connection. At this
point you can click Finish and the publishing process will copy your tables and
data into the remote SQL database.
Repeat this process for each of your databases. If you want to put your security
database data in the same remote database as your actual data you don't need to
modify the remote connect, you just need to publish the local copy of the
security database.
Modify web.config for remote testing
You should now have a copy of your data on your remote database(s). You can test
your application locally with the live remote data, but before you do this you
must modify the web.config file of your application to work with the remote
copies of your database. If you don't need the security database this is a
simple matter of replacing the Connection String with the one for your remote
database.
<connectionStrings>
 <add name="ConnectionString"
   connectionString=
               "Data Source=.\SQLEXPRESS;
                AttachDbFilename=|DataDirectory|\Database.mdf;
                Integrated Security=True;
                User Instance=True"
   providerName="System.Data.SqlClient"/>
</connectionStrings>
becomes:
<connectionStrings>
 <add name="ConnectionString"
   connectionString=
     "Data Source=mssql2005.servername.hostingcompany.com,61888;
      Initial Catalog=dbname;
      User Id=MyDatabaseUser;
      Password=MyDatabaseUserPassword;"
   providerName="System.Data.SqlClient"/>
</connectionStrings>
Making the security database is more complex, as the default situation is that
there are no entries for security in the applications web.config file as they
are set by default in the system config files.
The first stage is to remove the existing reference (just in case it exists) and
add a new connection string for your remote security database. You end up with:
<connectionStrings>
 <remove name="LocalSqlServer" />
 <add name="LocalSqlServer"
   connectionString=
     "Data Source=mssql2005.servername.hostingcompany.com,61888;
      Initial Catalog=securitydbname;
      User Id=MySecurityDBUser;
      Password=MySecurityDBPassword;"
   providerName="System.Data.SqlClient"/>
 <add name="ConnectionString"
   connectionString=
     "Data Source=mssql2005.servername.hostingcompany.com,61888;
      Initial Catalog=dbname;
      User Id=MyDatabaseUser;
      Password=MyDatabaseUserPassword;"
   providerName="System.Data.SqlClient"/>
</connectionStrings>
Note: if you have chosen to put your security information in the same database
as your site data the connectionString attribute will be the same.
The next stage is to add the security provider entry to the web.config file.
Find the <membership> element (if it exists) and delete it.
Add the following replacement <membership> element:
 <membership defaultProvider="RemoteSqlProvider">
  <providers>
    <clear/>
    <add name="RemoteSqlProvider"
         connectionStringName="LocalSqlServer"
         enablePasswordRetrieval="true"
         enablePasswordReset="true"
         requiresQuestionAndAnswer="false"
         applicationName="/"
         requiresUniqueEmail="false"
         passwordFormat="Encrypted"
         maxInvalidPasswordAttempts="3"
         minRequiredPasswordLength="6"
         minRequiredNonalphanumericCharacters="1"
         passwordAttemptWindow="10"
         passwordStrengthRegularExpression=""
         type="System.Web.Security.SqlMembershipProvider,
               System.Web,
               Version=2.0.0.0, Culture=neutral,
               PublicKeyToken=b03f5f7f11d50a3a"/>
 </providers>
</membership>
Note: you can alter the membership attributes, such as minimum password length,
to suit your own security requirements.
Test application
You may now test your application. It should work as before, except that now the
application will be working with live remote data and security details.
Upload application
You may now use FTP to upload your application into its target folder on your
remote web space. Don't upload the App_Data folder as it is redundant.
Modify web.config for final deployment
The only change that may be required is to modify the connection string in your
web config file. The connection string for accessing your SQL database may be
different depending on whether it is being accessed from outside the hosting
company's environment, e.g as you just tried, or from within, e.g having
uploaded it to the hosting company's server. If this is the case you should
replace the connection string as described above. It
is good practice to keep copies of your web.config file for all scenarios (i.e.
testing locally during development, testing locally with a live remote database
and finally the live configuration for the remotely hosted application.