Creating a MasterPage based site with a Sitemap
We will create a website containing different sections, for the public, members
and administrators. The navigation will be done using a simple bulleted list,
based on an ASP.NET sitemap.
Instructions
Create a new empty website
Create a new MasterPage (I will use C# as the language).
<%@ Master Language="C#" CodeFile="MasterPage.master.cs"
           Inherits="MasterPage" %>
<!DOCTYPE
   html PUBLIC "-//W3C//DTD XHTML 1.0 Transitional//EN"
   "http://www.w3.org/TR/xhtml1/DTD/xhtml1-transitional.dtd">
<html xmlns="http://www.w3.org/1999/xhtml" >
<head runat="server">
  <title>Untitled Page</title>
</head>
<body>
  <form id="form1" runat="server">
  <div>
      <asp:contentplaceholder id="ContentPlaceHolder1"
                              runat="server">
      </asp:contentplaceholder>
  </div>
  </form>
</body>
</html>
Add your basic structure around the content place holder, but leave the menu
empty. Create an empty stylesheet and put a link to it in the Masterpage.
<%@ Master Language="C#" CodeFile="MasterPage.master.cs"
Inherits="MasterPage" %>
<!DOCTYPE
html PUBLIC "-//W3C//DTD XHTML 1.0 Transitional//EN"
"http://www.w3.org/TR/xhtml1/DTD/xhtml1-transitional.dtd">
<html xmlns="http://www.w3.org/1999/xhtml" >
<head runat="server">
<link href="StyleSheet.css"
rel="stylesheet" type="text/css" />
<title>Untitled Page</title>
</head>
<body>
<form id="form1" runat="server">
<div id="container">
<div id="header">
<h1>Simple Masterpage layout with sitemap</h1>
</div>
<div id="menu">
<!-- To Do -->
</div>
<div id="main">
<asp:contentplaceholder id="ContentPlaceHolder1"
runat="server">
</asp:contentplaceholder>
</div>
<div id="footer">
<p>Copyright © John P Scott, 2008</p>
</div>
</div>
</form>
</body>
</html>
Add folders for your pages. As a minimum a folder for each restricted class
of user, e.g. admin and member. You could have a separate folder for each page
(except the default home page).
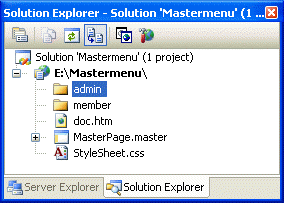
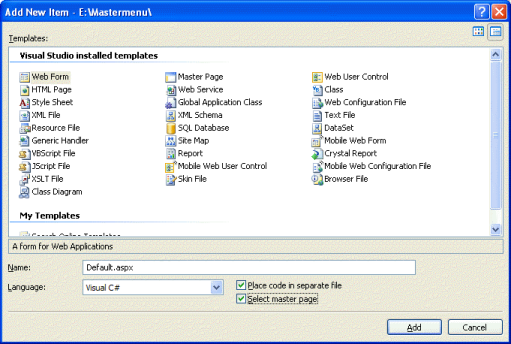
Now create your pages based on the masterpage. Start with the default home
page.
You now have a site structure. You will probably use more descriptive names
for your pages.

Now we need to create a site map for our website. Choose Site Map from the
Add New Item dialog.
<?xml version="1.0" encoding="utf-8" ?>
<siteMap
  xmlns="http://schemas.microsoft.com/AspNet/SiteMap-File-1.0" >
    <siteMapNode url="" title=""  description="">
      <siteMapNode url="" title=""  description="" />
      <siteMapNode url="" title=""  description="" />
    </siteMapNode>
</siteMap>
The default new site map has a single root page node with two sub pages. You
can only have one root page, so for a simple single level menu you put all your
pages in the sub-level. It is easy to cut and paste the two sample ones until
you have enough entries. E.g.
<?xml version="1.0" encoding="utf-8" ?>
<siteMap
  xmlns="http://schemas.microsoft.com/AspNet/SiteMap-File-1.0" >
    <siteMapNode url="" title=""  description="">
      <siteMapNode url="" title=""  description="" />
      <siteMapNode url="" title=""  description="" />
      <siteMapNode url="" title=""  description="" />
      <siteMapNode url="" title=""  description="" />
      <siteMapNode url="" title=""  description="" />
      <siteMapNode url="" title=""  description="" />
      <siteMapNode url="" title=""  description="" />
      <siteMapNode url="" title=""  description="" />
    </siteMapNode>
</siteMap>
The root node won't be used, so we give it the URL "~/." (Note: the ~ symbol
signifies the root of the website).We fill in the other entries in the order we
want them:
<?xml version="1.0" encoding="utf-8" ?>
<siteMap
  xmlns="http://schemas.microsoft.com/AspNet/SiteMap-File-1.0" >
    <siteMapNode url="~/."
                 title="Dummy home link"
                 description="Dummy home link">
      <siteMapNode url="~/default.aspx"
                   title="Home page"
                   description="Home page" />
      <siteMapNode url="~/default2.aspx"
                   title="Public page"
                   description="Public page" />
      <siteMapNode url="~/member/default.aspx"
                   title="Member home"
                   description="Member Home" />
      <siteMapNode url="~/member/default2.aspx"
                   title="Member 2nd page"
                   description="Member 2nd page" />
      <siteMapNode url="~/member/default3.aspx"
                   title="Member 3rd page"
                   description="Member 3rd page" />
      <siteMapNode url="~/admin/default.aspx"
                   title="Admin home"
                   description="Admin Home" />
      <siteMapNode url="~/admin/default2.aspx"
                   title="Admin 2nd page"
                   description="Admin 2nd page" />
      <siteMapNode url="~/admin/default3.aspx"
                   title="Admin 3rd page"
                   description="Admin 3rd page" />
    </siteMapNode>
</siteMap>
Now we can add our menu into the Masterpage. I will use a bulleted list and
if you click the Smart Tag you will see::
Click Choose Data Source and select New Data Source and select Site Map from
the list. You can then choose Title as the display value and URL as the data
value. There are just a couple of things to do now to make the menu display
properly. We need to set the BulletedList property DisplayMode to be HyperLink.
We also need to set the SiteMapDataSource property ShowStartingNode to false.
We can now save the MasterPage, which will update all the actual pages. We
can then edit the actual pages to put their content in.
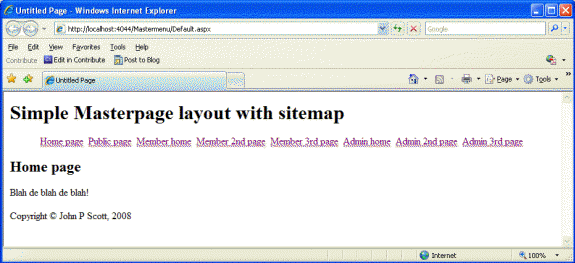
The resulting pages have a structure which is very simple and we can use CSS
to decorate and organise the layout on the screen. For example, the CSS to make
the menu horizontal and spaced across the page is:
#menu ul
{
  margin: 0;
  padding: 0;
  text-align: center;
}

#menu li
{
  margin: 0;
  padding: 0 0.25em;
  list-style-type: none;
  display: inline;
}
Resulting in:
We could have used alternative Menu controls from the Navigation section, but
you need to consider the accessibility issues with the JavaScript based menus
that they create before using them. A simple unnumbered list can create pleasing
effects using CSS only, and so they are inherently accessible, unless you choose
bad colour combinations or styles switches when hovering over menu items.