Editing, Deleting and Inserting Data
All the database linked controls provide mechanisms for editing and deleting data,
each with its own configuration mechanism. Inserting data can be done with the
ListView, DetailsView
and FormView controls. The DataList and Repeater controls require a lot of work
to allow editing. For the purposes of this course we will look at four examples
in detail. The first, just using a GridView, is a trivial solution for performing
edits and deletes. The second, using the DetailsView control, is a trivial solution
for performing insertion of new records. The third integrates the previous two to
provide a comprehensive and tidier solution for edit, delete and insert. The
fourth uses the automated techniques in the ListView and will expose some of
the power and limitations of the control.
Configuring the SQLDataSource for Updates, Edits and Deletes.
In the previous page we configured the Advanced properties for the connection to table tblStock
and selected the option to 'Generate INSERT, UPDATE and DELETE statements'. If we
have a simple database browsing application (i.e. we only want to see data, not
edit it), we would not need to do this. However, in preparation for this session
we have preconfigured our SQLDataSource to include the necessary SQL statements
and parameters to enable editing functions. In a multiuser environment there may
be issues of concurrency, where potentially more than one person is trying to edit
the same record. The theory for this is beyond the scope of this tutorial, but one
mechanism to tackle this problem is called Optimistic Concurrency and we can choose
this in the advanced options too.
Editing using a GridView - step by step
This is a simple process involving the setting of a couple of properties.
- Close all projects and copy your GridView website to a new project called GridViewEdit.
-
In design view click on the GridView control on your web page.
- Click on the
small triangle to the top right of the GridView control to display the Smart Tag
popup. From here it is possible to configure the data source (so you can check whether
the advanced options have been set).
- You will see checkboxes for Editing and
Deleting (Paging, Sorting and Record Selection can also be enabled from here). Select
Edit and Delete and any other checkboxes you require.
- Save and run the application.
Download the
ZIP version of GridViewEdit.
Insertion using a DetailsView - step by step
- Close all projects and Copy your DetailsView website to a new project called DetailsViewInsert.
-
Open the default web form 'default.aspx'.
- Use the Smart Tag for the DetailsView control select 'Enable Inserting'.
- Amend the DefaultMode property of the DetailsView control to be Insert.
- Save your project and run it.
Note that now the DetailsView is locked in insert mode. Once you add a new record
the DetailsView changes ready to accept a new record. If you set the DefaultMode
to ReadOnly you will always see the current record, until you select the Insert
link.
Download the
ZIP version of DetailsViewInsert.
Using a DetailsView with a GridView - step by step
The previous two examples show how easy it is to cover the functionality of Edit,
Delete and Insert. However, it would be nice to link the two approaches. A GridView
can be used as the master view for selecting an active record, and the DetailsView
can be used as the interface for editing, deleting and inserting records.
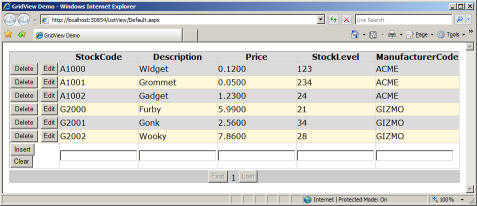
This approach is shown below and uses the GridView to present the table data and
allow selection of an individual record. Selecting a record brings up that record
in a DetailsView. The DetailsView has links to allow editing the record,
deleting the record or inserting a new record.
- Close all projects and copy your GridView website to a new project called GridViewDetailsEdit.
-
Use the SmartTab popup for the GridView to enable the Select record, Paging and
Sorting options. (Do not enable Editing and Deleting)
- Drop a DetailsView control
onto your web page.
- Select your existing SQLDataSource to link the DetailsView
to your database, but at the
'Configure the SELECT Statement' page of the wizard you need to click the WHERE
button.
- In the 'Add WHERE Clause' page you should select
StockCode in the 'Column' dropdown,
Control in the 'Source' dropdown and GridView1 in the 'ControlId' drop down, as
in the following image.
- Now click Add and then click Cancel to exit the Add WHERE Clause dialog.
- Save your project and run it.
- Select a record by clicking the Select link
by the corresponding record. The DetailsView should show the detail for that record.
-
You can click Edit or Delete to perform the required action.
- If you click
New in the details view a blank record is displayed for you to fill in. Click Insert
to insert the new record. You will notice that the new record does not appear in the
GridView. The next step solves this.
- Close Internet Explorer and select the DetailsView control.
- In the properties for the DetailsView select the Events button and double click
the ItemInserted event. In the empty event handler for DetailsView1_ItemInserted type
the following code:
GridView1.DataBind();
- You need to repeat this for the ItemDeleted event and the ItemUpdated event.
- The one remaining problem with the page is that it does not show an initial record
in the DetailsView. We would like the first record in the table to be selected in
the GridView and displayed in the DetailsView. We can acheive this by typing the
following code into the empty Page_Load event handler in the .aspx.cs file:
if (!Page.IsCallback) GridView1.SelectedIndex = 0;
We should only set the initial selected record the first time the page is loaded.
Succeeding calls to the page will retain the previous setting.
Note: This approach will not work if the table is initially empty.
In a real application you would probably only display the stock code and description
in the GridView. This can easily be done using the Smart Tag and choosing Edit Columns.
Download a
ZIP version of GridViewDetailsEdit.
An alternative approach is to set the GridView to allow editing and deleting
and use the DetailsView in Insert mode. This approach doesn't require any C#
code as the DetailsView can be linked to the same SqlDataSource and so the
GridView automatically updates when a new record is inserted.
Using a ListView as a generic view/edit/delete/update control
The ListView control can be totally controlled from code, however, there is
a wizard which allows you to produce quite advanced database editing
features, within limits.
If you drop a ListView on your web form you are presented with an
anonymous grey box and a smart tag which allows you to specify a data
source.
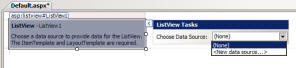
Having chosen or created a datasource (assuming you specify advanced options
to generate editing statements) the smart tag gives you the option to
configure the ListView. The Configure ListView dialog allows you to specify
the layout type, a restricted set of style based formatting options and
editing/display options.
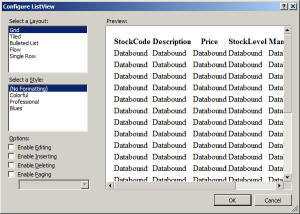
You will see that you can specify the full range of editing options (insert,
delete, edit) as well as pagination.
When working with a single table this is quite a powerful automated setup.
However, if you have master detail relationships or lookup fields which
would be useful to represent with drop down lists you need to manually edit
the ListView element.