Uploading and Downloading Files
A lot of applications require information to be transferred in the form of data
files. For example, a prospective employee may want to upload a CV in Microsoft
Word format to an employment agency's website. Likewise, an employer may want to
download CVs of prospective employees. There are lots of applications potentially
requiring file transfer; from software download to image bureaux.
File upload can be achieved in a straightforward way by using a FileUpload control.
This control only requires a small amount of code to cause an uploaded file to be
stored on the file system of the server. However, it is sometimes preferable to
store uploaded files in a database. This is more complex, but both techniques will
be presented below, together with a mechanism to download a file which may or may
not have been previously uploaded.
Uploading using a folder on the server
For this example we will assume there is a folder in the home directory for the
application called 'upload'.
- Close any open project and create a new C# ASP.NET Website called Upload
- In Solution Explorer create a new folder called Upload in the application directory.
- Drag a FileUpload control onto the default web page.
- Drag a Button onto the web page and change its label to 'Upload File'.
- Double click the button, to bring up the code window with an empty button click
event handler for the button, as follows:
protected void Button1_Click(object sender, EventArgs e)
{

}
- We need code to check that a file has been selected by the user, and if so code
to accept the file and store it in the Upload folder. The FileUpload control has
several properties and methods which allow us to do this quite easily. FileUpload
has a property HasFile which returns true if a file is available. The SaveAs method
simply needs the full path for the file when it is placed on the server. In this
case we need to make up the file path by adding the bare filename of the file to the
actual location of the Upload folder. The bare filename is given by the FileName
property of the FileUpload control. There is a predefined method called Server.MapPath
which will return an actual path if you give it a URL on the server. In this case
the URL is '~/Upload/'. Note: we have used the '~' symbol before to denote the home
folder for the application. The complete code is:
protected void Button1_Click(object sender, EventArgs e)
{
  if (FileUpload1.HasFile)
    FileUpload1.SaveAs
        (Server.MapPath("~/Upload/") + FileUpload1.FileName);
}
These two lines of code perform the complete file upload process.
Security notes
You may think there are security issues with this scenario, and you are
right. However, all is not as straightforward as it may seem. The end user
of your site only has permission to view your pages, so you may ask how they
can save a file on the server. The answer is that it is not the end user
saving the file it is the ASP.NET server process. Security is achieved by
making sure that:
- The server process has permissions to save files in the target
folder.
- The application doesn't allow the end user to choose arbitrary
locations to save the uploaded file.
- The end user doesn't have permissions to execute the uploaded file
on the server using web based access.
- Restricting the types of file that can be uploaded.
The above points are addressed by the web or network administrator who
performs the configuration of the application.
Downloading a file
The simplest form of download uses exactly the same mechanism as a hypertext link.
In our page we can include a link, whose URL is the name of the file. This can be
created dynamically from a list of files in a folder.
However, the problem with
this solution is that the file may automatically open in the user's browser, replacing
the current page. Files which are not recognised by the browser (e.g. .EXE files)
will cause the browser to prompt the user to Open/Run
or Save the file, as follows:
An example of the simple download is given in the
ZIP version of Download.
A more controlled solution to the download problem forces the browser to display
a file download security warning and provides the filename ready to save the file
to your local file system.
When you retrieve a document from the Internet it is packaged in an HTTP Response
packet. The packet has a header which specifies the content type. This will usually
be an HTML file or an image such as a GIF or JPG file. Content types are specified
using a naming scheme called MIME (Multi-purpose Internet Mail Extensions) which
was originally created for transfer of files using email. A
MIME type has two parts separated by a solidus ('/'). The first part is a generic
type, the second part is the specific variant. An HTML page has MIME type 'text/html'.
A .jpg image has MIME type 'image/jpeg' and a .gif image has type 'image/gif'.
If we want to allow a user to save a file that is being downloaded we need to return
the file with a header that tells the users browser that it is a data file and shouldn't
be displayed. The usual MIME type for this is 'application/octet-stream'. This signals
the browser that binary data is being sent. The browser will respond by asking the
user if they want to save the file or open/run it. You can also send a header as part
of the HTTP response which tells the browser that a file is being sent and also
gives its name. This header type is named 'Content-Disposition'. Assume we have
a webpage with a TextBox (txtFilename), a Button (butDownload) and a Label (labMessage).
The user can type a filename in the TextBox
(not very realistic), and when the Button is clicked the file will be downloaded.
The code to handle this scenario looks like this:
protected void butDownload_Click(object sender, EventArgs e)
{
  if (System.IO.File.Exists
       (Server.MapPath("~/Upload/") + txtFilename.Text))
  {
    Response.Clear();
    Response.ContentType = "application/octet-stream";
    Response.AddHeader
       ("Content-Disposition",
        "attachment; filename=\"" + txtFilename.Text + "\"");
    Response.Flush();
    Response.WriteFile
       (Server.MapPath("~/Upload/") + txtFilename.Text);
    labMessage.Text = "";
  }
  else
  {
    Message.Text = "File does not exist";
  }
}
You can download a
ZIP version of the ForceDownload application
.
The code to fill a list box with the names of files is relatively
straightforward. The following code shows how to list all .jpg files from
the 'upload' folder. The method Path.GetFiles() returns an array of strings
containing the fully qualified filename (including drive letter and folder
names) for each of the matching files.
  foreach (string fname in
    Directory.GetFiles(Server.MapPath("~/upload"),
                       "*.jpg",
                       SearchOption.TopDirectoryOnly))
      {
        ListBox1.Items.Add(Path.GetFileName(fname));
      }
Note: if you want to allow the end user to select a file in the list a press
abutton to down load there is one thing to watch for. You must make sure the
listbox gets filled with the filenames just once (not every time the page
loads) otherwise the page can't remember which file was selected. You can
download a ZIP version of the
ListBoxDownload application which uses this technique.
Uploading with a database
The previous sections have ignored the problems of keeping track of files which
have been uploaded, and of giving the user some indication of which files are available
for download in a dynamic way. A more realistic scenario would mean that uploaded
files should be logged in a database, so that the current list can be made available
to the user. There, is still an important decision to be made, and that is whether
to save the uploaded file in the database, or whether to simply save a reference
to the file in the database and store the files in a separate folder. Both possibilities
have advantages and disadvantages, but both are still viable. The choice probably
depends on circumstances.
Database requirements - File saved as part of record
The file will be saved as in a field as a binary image, so we will also need to
keep track of other information about the file. This will be the filename, its content-type,
and the size of the file. We cannot use the filename as the key field, as there
is a good chance of files being uploaded with the same filename, so we should use
an autonumber field (identity field in MS SQL) to avoid duplicate keys. If filenames
are duplicated, we may also want to store further information about the file. For
example, an employment agency may allow CVs to be uploaded, so their may be a field
identifying the employee. Another example might be an image repository where there
may need to be fields for the identity of the photographer, a description of the
image and the date taken.
Database requirements - File saved separate from the database
In this scenario we will need a unique key for each record, which again could be
done with an autonumber field. However, Since the files are being saved independently
of the database we will need to use a unique filename to save each file. A simple
solution to this is to store the file using the key value as its name, and store
the original filename as part of the record. We still need to have fields for 'content-type'
and file size. We may also want identification information for the 'owner' of the
file and other descriptive information.
Comparison
The only real difference between the table structures for the scenarios is the presence/absence
of a field for the file data. However, the separate file solution poses a problem
when implementing the code to save the record and save the file as we shall see
later.
Uploading and downloading files saved in the database.
Before looking at the process in detail, let us look at the solution from the point
of view of the design and development process.
- Web form design: a simple interface is all that is required for file upload (FileUpload
control and an Upload button), and all the work will be done within the click event
handler for the Upload button. However, file download ought to be made convenient
for the user by providing a list of files for download. This can be done by having
a GridView control listing the records in the database. We will need to trim the
GridView so that it doesn't display the FileData column as it is not a simple field
(e.g. text or numeric). We can enable the Select command on the GridView. If we
change the text from 'Select' to 'Download' this provides a simple interface to
allow the user to select and download a file for download in one action. We can
also enable the Edit, Paging and Sorting commands to maximize the usefulness of
the interface.
- Script code: We only have two actions to code on the web form. These are the Upload
File button and the SelectedIndexChanged action on the GridView.
- Upload Code: We must connect to the database, retrieve the filename, content type,
file size and file data from the upload control. Then we create a parameterised
SQL insert command for creating a new record in the database. We set the values
of the parameters and execute the command. Finally we must refresh the GridView
control so that it displays the grid with the newly inserted record.
- Download code: We must get the filename from the selected row of the GridView.
We can then connect to the database, build an SQL select statement to retrieve the
record corresponding to the selected filename. We execute the select statement and
retrieve the values, including the file data from the retrieved record. Finally
we can send the response to the client by creating a new response packet, much like
the non-database version of the file upload/download example.
Step by step
- Create a new C# ASP.NET Website called UploadDB.
- Create a new database, called Uploads.mdf with a table called tblFileData, matching
the following structure:
Make sure Filename and ContentType are large enough to hold meaningful data (minimum
of 50 characters), and note the Identity properties for the FileId field.
- Build a user interface matching the following display, noting that you may initially
have four columns displayed in your GridView, and Download links may read 'Select':
- If you have got four columns (FileData is displayed) you will need to amend the
properties of the GridView to hide the FileData column. Use the SmartTag dialog
and choose Edit Columns
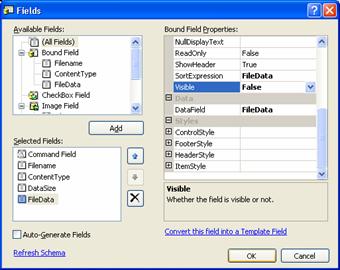
- In the Selected Fields section choose FileData. In the Bound Field Properties
section set the Visible property to False.
- If the GridView has 'Select' links you will need to change the text to 'Download'.
Using the Edit Columns dialog (from stage 4) choose the Command Field and edit BoundField
properties. Change the SelectText property to 'Download'.
- Your web form should now be the same as in item 3.
Now we need to write the script code to perform the upload and download.
First the upload.
Select the Upload File button and double click it. You will get an empty event
handler for the button.
- The pseudo code for the event handler is as follows:
If the upload control has a file attached
    Get the filename, content type, file size
        and file data from it
    Open a connection to the database
    Build an SQL command for the insert
    Copy the data into the SQL command
    Execute the SQL command
    Update the GridView control
- Note: we already have a connection string and an insert SQL command in the SQLDataSource
we used for the GridView. This means we can copy these when we need to use them.
First put this library reference at the top of your .cs file.
using System.Data.SqlClient
-
Below is the actual code
void Button1_Click(object sender, EventArgs e)
{
  // If the upload control has a file attached
  if (FileUpload1.HasFile)
  {
    // Get the filename, content type, file size
    // and file data from it
    String Filename = FileUpload1.FileName;
    String ContentType = FileUpload1.PostedFile.ContentType;
    int FileSize = FileUpload1.PostedFile.ContentLength;
    Byte[] FileData;
    FileData = new Byte[FileSize];
    FileUpload1.FileContent.Read(FileData, 0, FileSize);
    // Open a connection to the database
    SqlConnection Conn =
        new SqlConnection(SqlDataSource1.ConnectionString);
    Conn.Open();
    // Build an SQL command for the insert
    SqlCommand cmd =
        new SqlCommand(SqlDataSource1.InsertCommand, Conn);
    // Copy the data into the SQL command
    cmd.Parameters.Add
       ("@Filename", SqlDbType.Text, 50).Value = Filename;
    cmd.Parameters.Add
       ("@ContentType", SqlDbType.Text, 50).Value = ContentType;
    cmd.Parameters.Add
       ("@DataSize", SqlDbType.Int).Value = FileSize;
    cmd.Parameters.Add
       ("@Filedata", SqlDbType.Image, FileSize).Value = FileData;
    // Execute the SQL command
    cmd.ExecuteNonQuery();
    Conn.Close();
    // Update the GridView control
    SqlDataSource1.Select(new DataSourceSelectArguments());
    GridView1.DataBind();
  }
}
Now we need to write the script code for downloading a file once it is selected
in the GridView. When the user selects a row in a GridView, the SelectedIndexChanged
event is fired. So we need a handler for this event. He we go!
- Select the GridView control on your form and choose the Event icon in the properties.
Double click the SelectedIndexChanged event and you will get an empty event handler.
- The pseudo code for downloading a file is:
Get the filename from the selected row of the GridView
Open a connection to the database
Build an SQL select statement to retrieve the record
Copy the filename into the command
Execute the SQL statement
Get the file size and file data from the retrieved record
Send the retrieved file to the client
- The code for this is given below:
void GridView1_SelectedIndexChanged(object sender, EventArgs e)
{
  // Get the filename from the selected row of the GridView
  GridViewRow row = GridView1.SelectedRow;
  string Filename = row.Cells[1].Text;
  // Open a connection to the database
  SqlConnection Conn =
    new SqlConnection(SqlDataSource1.ConnectionString);
  Conn.Open();
  // Build an SQL select statement to retrieve the record
  SqlCommand cmd =
   new SqlCommand
    ("Select * from [tblFileData] where [Filename] = @Filename;",
     Conn);
  // Copy the filename into the command
  cmd.Parameters.Add
    ("Filename", SqlDbType.NChar, 50).Value = Filename;
  // Execute the SQL statement
  SqlDataReader dr = cmd.ExecuteReader();
  dr.Read();
  // Get the file size and file data from the retrieved record
  int FileSize = dr.GetInt32(2);
  Byte[] FileData = new Byte[FileSize];
  dr.GetBytes(3, 0, FileData, 0, FileSize);
  Conn.Close();
  // Send the retrieved file to the client
  Response.Clear();
  Response.ContentType = "application/octet-stream";
  Response.AddHeader
      ("Content-Disposition",
       "attachment; filename=\"" + Filename + "\"");
  Response.Flush();
  Response.BinaryWrite(FileData);
}
Download a
ZIP version of UploadDB.
Uploading and downloading files saved externally to the Database
A different scenario will be used for this example so that we can show more features
of the .NET environment. We will create a photo library which will only accept the
upload of JPEG files with extension .jpg.
Before looking at the process in detail, let us look at the solution from the point
of view of the design and development process. The main difference between this
approach and the previous one is the need to generate unique filenames when files
are uploaded. The problem is that when we insert a new record, we need to know the
autogenerated key for the new record so that we can use it for the filename. To
make this work we have to use a special combination of SQL query statements. The
first is the insert query and the second is a select statement which returns the
value of the autogenerated key. As long as the two statements are executed together
the second part returns the actual key value. For this example we will only use
a simple table with a key field and a filename. The SQL for this is:
INSERT INTO tblUploads (Filename) VALUES (@Filename);
SELECT @FileID = SCOPE_IDENTITY();
The INSERT statement uses the value of the Filename from the Upload control.
The SELECT statement receives the value of the key field into the Parameter @FileId.
This value can be used to make the filename for storing the image in the upload
folder.
Download could be done as with the previous example, but we can make the interface
more effective by having an image control on the web form and making it display
the current selected image.
Step by step
- Create a new C# ASP.NET Website called UploadSeparate.
- Create a new database,
called Upload.mdf with a table called tblUploads, matching the following structure:
Make sure Filename is large enough to hold meaningful data (minimum of 50 characters)
and make the FileId an Identity field, like the previous example. -
Build a user interface matching the following display, noting that you may initially
have four columns displayed in your GridView, and 'View' links may read 'Select':
- Select the Upload File button and double click it. You will get an
empty event handler for the button.
First put these library references at the top of your .aspx.cs file.
using System.Data.SqlClient;
using System.IO;
- Below is the actual code for the button click:
protected void Button1_Click(object sender, EventArgs e)
{
 Label1.Visible = true;
 if (FileUpload1.HasFile)
  if (System.IO.Path.GetExtension
          (FileUpload1.FileName).ToLower() == ".jpg")
  {
   SqlConnection conn =
     new SqlConnection(SqlDataSource1.ConnectionString);
   SqlCommand cmd =
     new SqlCommand
       (@"INSERT INTO tblUploads (Filename)
                 VALUES (@Filename);
          SELECT @FileID = SCOPE_IDENTITY();",
        conn);
   cmd.Parameters.Add
      ("@Filename",
       SqlDbType.NVarChar, 50).Value = FileUpload1.FileName;
   cmd.Parameters.Add("@FileID", SqlDbType.Int, 4);
   cmd.Parameters["@FileID"].Direction =
                                ParameterDirection.Output;
   conn.Open();
   cmd.ExecuteNonQuery();
   FileUpload1.SaveAs
       (Server.MapPath("~/Uploads/") +
        cmd.Parameters["@FileID"].Value.ToString() + ".jpg");
   GridView1.DataBind();
   Label1.Visible = false;
  }
}
- The code for Gridview.SelectedIndexChanged is quite straightforward. It simply retrieves
the selected row, makes a URL from the key and sets the ImageUrl for the Image control.
The old filename is used to set the AlternateText. The code looks like this:
protected void GridView1_SelectedIndexChanged
                 (object sender, EventArgs e)
{
  GridViewRow row = GridView1.SelectedRow;
  Image1.ImageUrl = "~/uploads/" + row.Cells[1].Text + ".jpg";
  Image1.AlternateText =
                 "Original filename: " + row.Cells[2].Text;
}
Download a
ZIP version of the UploadSeparate application.