Validation
A vital aspect of any application is to make sure that data entered by a user is valid. In a web appication it is possible for some validation to be performed before
the data is sent to the server using client side scripts (e.g. data must be in the correct format, or an email address needs an '@' symbol and at least one '.'). Other data may need to be checked by the server once it has been submitted (e.g. check
for a valid user ID). ASP.Net provides a set of elements (Validation Controls) which can be linked to data entry elements to provide validation within the page. Validation
can be performed on the client (in some cases), or on the server. Various kinds of validation can be performed from simply checking that something/anything has been typed to checking complex patterns of letters and digits (e.g Postcode or ISBN).
Each validation control has an 'ErrorMessage' property and a 'ControlToValidate' property. You simply type a suitable message in the ErrorMessage property, which will be displayed if the data is invalid. You select the element from your page which you want to validate on the ControlToValidate property.
Simple Example of validation
We will modify the Professional website to check that the user has typed a name before clicking the Send button.
Step by step
If you want to keep your original simply copy the contents of the Professional folder to a new folder called E:\Web\SimpleValidate.
- Open your website (Professional or SimpleValidate).
- In the toolbox pane scroll down to the Validation section and expand it.
- Drop a RequiredFieldValidator to the right of the Textbox.
- Change the id of the control to 'validName'.
- In its properties change the value of ErrorMessage to 'You must type your name!'.
- In its ControlToValidate property select txtName from the dropdown list.
- Save your project and click Run
If you click 'Send' before typing anything you will see a message in red telling you that you need to type your name. Type your name and click 'Send' and now the page will display the Hello message with your name. Try out the
SimpleValidate
example or download the
Zip version of SimpleValidate.
Using the other basic validation controls
The other controls you can use are:
- RangeValidator
The RangeValidator allows you to specify a value type (string, integer, date, currency
or double) and a minimum and maximum value. If the entered data is not within the prescribed range (or type) then the error message is displayed. For example, integers
in the range 2000 and 2020. - RegularExpressionValidator
The RegularExpressionValidator uses the power of a mathematical technique called regular expressions to specify complex character sequences to validate against. The property ValidationExpression can be set to one of a predefined list of (mainly American) expressions, but you can also type in your own. Unless you are familiar with the mathematical technique your best bet is to do a Google search for example regular expressions. There are lots of websites specialising in regular expressions with lots of examples. - CompareValidator
The CompareValidator allows you to specify another value to compare the ControlToValidate against. This can be a typed value, a data type or another control (ControlToCompare). This is useful for Password forms where you need to verify that both copies of the typed password are the same. (For password fields make sure you change the type of the textboxes to password so that the value is hidden (behind *'s) when you type.)
Look at Web application
ValidateDemo
for an example of each type of validation control or download a
Zip version of ValidateDemo.
Advanced validation
The above validation controls all perform a single validation task, and annotate a control with an error message. The validation can be performed on the client if the browser permits it. However, an application may have more advanced validation needs which may require processing on the server. Also some form of validation summary on a page can be useful. Both of these are available. The CustomValidator control allows the application developer to write a script to perform the validation. The ValidationSummary Control does just what it says; it summarises the validation elements on a webpage.
How to use the ValidationSummary control
In its basic form you simply drop the ValidationSummary control onto your webpage in a suitable location. The control gets filled with the list of error messages from all the other validation controls on the page.
Take a look at application
ValidateSummary
or download a
Zip version of ValidateSummary.
How to use the CustomValidator control
Custom validation by its very nature implies that it will only work if you provide
a script to perform the validation. Various circumstance may prohibit you from using
one of the other validation controls. For example, a value may need to be validated against a list stored in a database, or a set of values may need to be verified
against specific valid combinations.
To demonstrate this we will produce a simple web application which allows you to
choose three presents from a list. This will also give us the opportunity to look
at how we use scripts with lists.
To build this application we will need a web form with a ListBox list on it, a CustomValidator,
a Button and a Label. We can edit the items in the ListBox at design time and modify
its properties to allow multiple select. The label will be used to display the selected
items, but in more realistic scenario these may be entered onto a database.
As mentioned earlier other validator controls may perform validation on the client, rather than
posting the form back to the server. This depends on the settings and version of
the client browser. The CustomValidator control, however, only works server
side, as the custom code needs to be executed to make the validator work.
We can force the server to perform validation by selecting the 'CausesValidation'
property on the ListBox to true, or we can explicitly request the page to validate
itself using the Page.Validate() method.
Either way we can check the result of validation using the Page.IsValid. We can decide
whether to perform any page actions dependent on the value of Page.IsValid.
Step by Step
- Create a new C# Web site called CustomValidate.
- Drop a ListBox, a CustomValidator, a Button and a Label onto the form and change
their (ID)s to lbPresents, validPresents, butSend and labSelection.
- Select the CustomValidator and select lbPresents from the dropdown list in the ControlToValidate property.
- Set the ErrorMessage property to 'You must select three presents'.
- Build some text
around the controls to make the user interface more appealing. For example:
- Double click the CustomValidator control. This should bring up the C# script view for the page and create an empty event handler for validation called 'validPresents_ServerValidate'.
- One of the arguments for the event handler is called 'args'. This has a field called 'IsValid'. If you set this to false then the ErrorMessage will be displayed. If you set it to true then the page passes its validation test and the error message is not displayed. So the pseudo code for our validation script is:
Set args.IsValid to False;
Count the number of selected items in the list.
If there are three, set args.IsValid to True;
- This converts to C# code as follows:
protected void validPresents_ServerValidate
      (object source, ServerValidateEventArgs args)
{
  args.IsValid = false;
  int numselected = 0;
  foreach (ListItem li in lbPresents.Items)
  {
    if (li.Selected)
    {
      numselected++;
    }
  }
  if (numselected == 3)
  {
    args.IsValid = true;
  }
}
- Now the only problem is that because it is the server working out whether the information is valid we need to cause the page to validate and put a check in to
make sure it is valid before filling in the message on the label. The code could
be done in an event handler for the Button, but since this is a very simple application
we can put the code in the Page_Load method, as follows:
protected void Page_Load(object sender, EventArgs e)
{
  labSelection.Text = "";
  Page.Validate();
  if (Page.IsValid)
  {
    foreach (ListItem li in lbPresents.Items)
    {
      if (li.Selected)
      {
        labSelection.Text =
          labSelection.Text + " - " + li.Value;
      }
    }
  }
}
You can try out
CustomValidate
or download the
Zip version of CustomValidate.
Validation with Database controls
The automatic functionality of the database controls makes it easy to provide edit
and insert functionality. However, with any user driven input mechanism it is wise
to build in input validation. A simple DetailsView form set to insert records into
a table can be used 'carelessly' and the default behaviour for attempting to insert
invalid data is to bring up an unfriendly error page.
In this section we will look at how to handle erroneous input using validation controls.
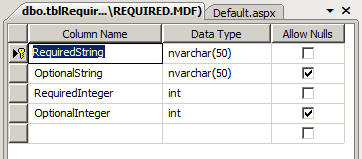
For the purposes of this we will use a simple database with one table which has
a range of data fields of differing requirements. The design view for the table
is shown below:
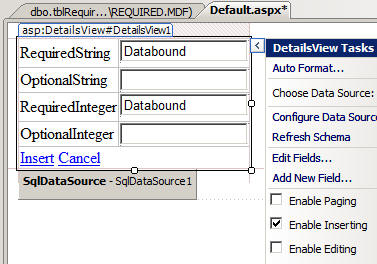
A simple DetailsView page defaulting to Insert mode can be set up as follows:
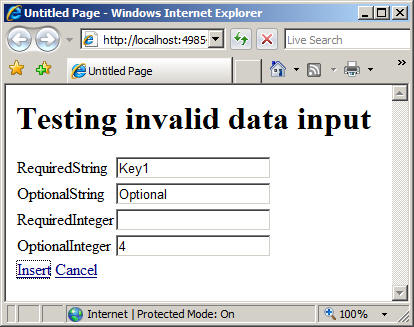
If we run this application and try to insert a record without a value for the RequiredInteger
field as follows:
we get the following error page:
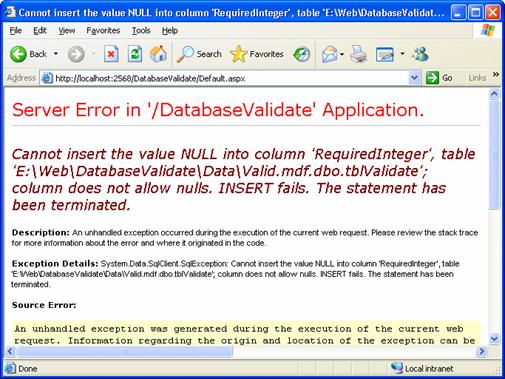
As you can see, unless you are an application
programmer, the resulting screen is not very instructive; and you have also lost control of the application. The only option is to
hit the Back button, and this can pose problems in database driven
web pages.
We can use validation controls to check user input before the application attempts
to insert the new record, however, it is not quite so simple as dropping a suitable
validation control for each field onto the form. Database controls, like DetailsView,
are by default automatically created and so the actual textboxes used when you want
to edit or insert a record are hidden and so they are not available for you to link
your validation controls to. You need to convert the fields you want to validate
to what VWD refers to as 'templated controls'. What this means is that VWD will
put actual controls on your web form, rather than hiding them. You do this by accessing
the Edit Fields dialog from the SmartTag popup. As follows:
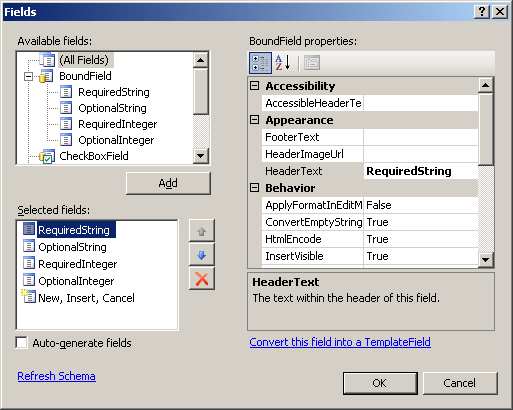
Choose the field you wish to add validation controls to and click the 'Convert this
field into a Template Field' link. In our case we want to add required field validators
to the RequiredString and RequiredInteger fields so we will just convert these two
fields.
When VWD converts the fields to actual controls, it gives them simple names, like
TextBox1, TextBox2 etc. To make it easy to keep track of we need to look in the
source code and identify the controls, and perhaps give them meaningful names. The
section of source code for the RequiredString field is shown below:
<asp:TemplateField SortExpression="RequiredString"
                   HeaderText="RequiredString">
  <EditItemTemplate>
   <asp:TextBox Runat="server"
            Text='<%# Bind("RequiredString") %>' ID="TextBox1">
    </asp:TextBox>
 </EditItemTemplate>
 <ItemTemplate>
   <asp:Label Runat="server"
            Text='<%# Bind("RequiredString") %>' ID="Label1">
    </asp:Label>
 </ItemTemplate>
 <InsertItemTemplate>
   <asp:TextBox Runat="server"
            Text='<%# Bind("RequiredString") %>' ID="TextBox1">
    </asp:TextBox>
 </InsertItemTemplate>
</asp:TemplateField>
You can see that the TemplateField for RequiredString has three templates: an EditItemTemplate,
an ItemTemplate and an InsertItemTemplate. When we are in Insert mode the InsertItemTemplate
is displayed on the form, so from the InsertItemTemplate we now know that the TextBox
is called TextBox1. If we only want to use one of the templates (like this example
where we will only ever use Insert mode) we can delete the others. This is also
true of the other elements in the SQLDataSource, such as the SQL commands and parameters.
We can change the templates easily by selecting Edit Templates from the Smart Tag.
The Smart Tag changes to this:
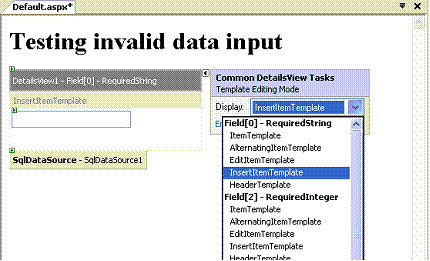
We choose the InsertItemTemplate for our field from the drop down list. We can now
edit our template, just like it was a simple form, and drop on the validation control,
and set its properties.
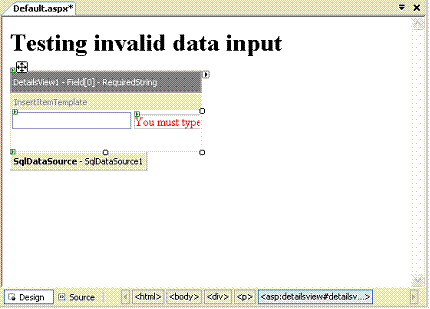
Above the ID of TextBox1 has been changed to 'txtRequiredString' to make it easy
to keep track of. The validation control is now linked to the textbox by amending
its ControlToValidate property to the name of the TextBox. We can edit the template
for the RequiredInteger field in the same way.
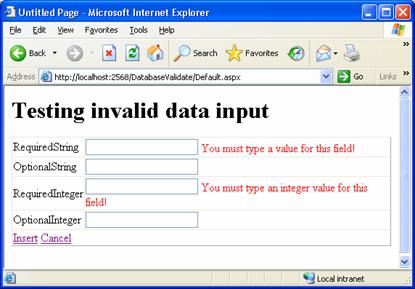
If we run the application and attempt to insert an empty record we will get:
Download the
ZIP version of DatabaseValidate.
Note: We have only trapped some of the potential errors with this application. We
would need to put extra validation in to check for validity of the numeric values,
and also the length of text, as the text fields are only defined for 50 character
fields. If we do not cater for a possible error then we will get an error page when
that error occurs. As well as validation controls we can also use properties for
the text boxes such as MaxLength to assist in the process.
Note 2: We can't possible trap all possible errors at the client side. A duplicate
key field has to be checked for on the server, so we may need to use a custom validator
and an alternative mechanism for interacting with the database to make sure error
pages do not arise.