Introduction to using Visual Web Developer
Visual Web Developer is one of a class of tools called Integrated Development Environments
(IDE). This term implies that all the elements required for the development and
testing of a system are included within the one piece of software. To a certain
extent this is true, but there are some prerequisites which are installed and configured
as part of the VWD install process, namely: .NET Framework 2.0 and above, and SQL Server
2005 Express. However, once this set of software is installed VWD is the only tool
required to develop and test web applications with database connectivity.
Running VWD
You should get a full screen window with a complex interface. Let's go though the
interface a bit at a time and briefly describe each element.
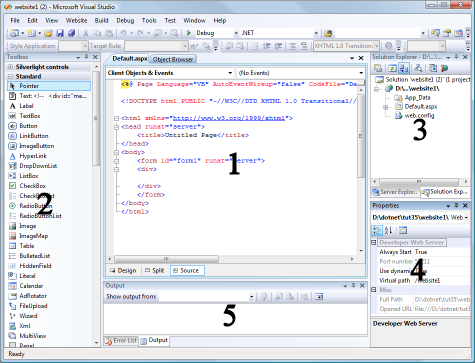
- Design Area
Here is where you work with the bits of your project. For example, you will design
the web page layout and write the scripts to make the page interactive. You can
have multiple elements open in this area, and switch between them at any time. By
default this section will contain a Start Page, though you can configure VWD to
load your last project, making it easy to carry on where you left off. - Toolbox
This area contains all the elements you can use to build your project. For example,
when you are designing the web page layout you can choose from all the web page
elements and drop them onto your page. - Explorer
This contains a solution explorer and a database explorer. The solution explorer
shows you all the elements which make up your project, including all the web pages
and the scripts. The database explorer shows you all the databases which are available,
allows you to connect to other databases and even create new ones. - Properties
This allows you to modify all the elements in your project. For example, you can
change the list of items displayed in a listbox. - Output
This shows you information about your project when you try to run it. There is an
output pane which displays progress information, and an error pane which lists the
errors which may have occurred. - Other windows
There are lots of other panes which can be viewed as and when required. The whole
interface is configurable, and you can make each pane float or dock in different
positions.
Each of these sections changes when you are working on an actual project. Let's
create a brand new project and see what happens.
Your first project
We will build a single page website which displays the message 'Hello World' purely
to demonstrate the way in which the user interface for VWD changes once a project
is loaded.
Step by step
- From the menu select File | New Website (for VS 2005 it's File | New | Web site...)
- Choose 'ASP.NET Web Site' from the templates list, select 'Visual C#' from the
language drop down & change the Website1 bit of the name to HelloWeb. Press
OK.
- Look at what has changed in the UI. You should see some files/folders listed in
the Solution Explorer and the home page (default.aspx) should have opened in the
code area. There will be Design and Source tabs available at the bottom so you can
switch between WYSIWYG mode and HTML mode.
- Switch to Design mode and type 'Hello World' in the page design.
- Select the text with the mouse.
- Choose 'Heading 1 <h1>' from the toolbar style dropdown
- Click Run
(the green 'play' button).
- Note the debug message and press OK.
Your website will now run. VWD starts up its own web server and launches Internet
Explorer to open up your page. You should see:
Try out the
Hello Page
or download the
ZIP version of Hello.
A simple page with interaction
We will now create a page which allows the user to enter some details (their name)
and submit it to the server. The page is returned with the value added to the text
of the page. A TextBox is used for the input. A Button is used to submit the data
to the server. A Label is used to display text once the information is submitted.
Step by step
Note: At various stages you may have to point to the end of lines and press <Enter>
to get your formatting correct.
- Create new C# website called SimpleForm.
- On the design page type 'Welcome'. Press <Enter> and format 'Welcome' as Heading 1.
- Type the text 'What is your name? '.
- Drop a Textbox onto the end of the line.
- Drop a Button onto the next line and in its properties change the value of the
'text' property to 'Send'.
- Drop a Label onto the next line and in its properties clear the value of the 'text'
property.
- You now have a web page containing various interactive elements. Their default
names are TextBox1, Button1 and Label1.
The page should look like this:
- Double click the Button.
- The design area should change to show some C#
code with an empty function called '
Button1_Click', like this:
    protected void Button1_Click(object sender, EventArgs e)
    {

    }
Note: this is an example of a default event handler. Clicking the button is an event.
There are lots of events that can happen when the user is interacting with a webpage,
however, for every element on a page there is a default event and VWD will automatically
create a function to handle it for you if you double click it in design view. -
In the blank line between the braces { } type your first piece of C# code:
Label1.Text = "Hello " + TextBox1.Text;
As follows:
    protected void Button1_Click(object sender, EventArgs e)
    {
        Label1.Text = "Hello " + TextBox1.Text;
    }
Note: as soon as you start typing a dropdown list appears with all the possible
options, as follows:
The cursor moves down to match what you are typing and you can press enter to accept
the current entry. This automatic predictive text feature is called 'intellisense'.
You don't have to type along, as you can scroll down and select the option you want
directly with either the mouse or the keyboard. - Save your website and press
the run button.
- When the page has compiled and is running you can type your
name, press the Send button and the page will update with the message 'Hello <your
name>' at the bottom. As follows:
Try out the
Welcome page
or download the
Zip version of Welcome.
And now to do it professionally
The examples above have both used default values for most things. However, when
developing a complex application certain defaults may make it difficult for you
to remember what you are doing. For example, a complex form with lots of text boxes
(e.g. registration form) would by default have textboxes called TextBox1, TextBox2,
TextBox3 ... TextBoxn. If you are writing a script to work with these details you
may struggle to remember which one is the surname, which is the postcode etc. The
simple answer to this problem is to adopt a practice of always changing the default
id of each element as you create it. Adopt a simple strategy which is easy to remember.
A simple strategy would be to prefix the name of the element with the element's
type (e.g. txtPostCode for a textbox and labHelloMessage for a label). You should
do this for all elements, including the form, but you should do it as you go along.
If you change something's name later in the project development process after you
have written some code it will become difficult to match the old code with the new
names.
Let's do the previous example the professional way.
Step by step
- Close your existing project and create a new C# ASP.NET Website called Professional.
-
In the properties section choose 'DOCUMENT' from the drop down list and change the
'title' property to 'Welcome page'.
- In the designer, select the Source view, click on the <form> tag. Make sure
the form tag is displayed in the properties section and change the '(id)' property
to 'frmHello'.
- On the design page type 'Welcome' and format it as Heading 1.
- Type the text 'What is your name? '.
- Drop a Textbox onto the end of the line, and in the properties section change
its '(id)' property to txtName.
- Drop a Button onto the next line, and in the properties section change its '(id)'
property to 'butSend' and its 'text' property to 'Send'.
- Drop a Label onto the next line, and in the properties section change its '(id)'
property to 'labHello' and clear the value of the 'text' property.
- You now have a web page containing various interactive elements. Their names are
txtName, butSend and labHello.
- Double click the Button.
- The design area should change to show some C# code with an empty function called
'butSend_Click'.
Note: Now you have changed the name of the button its event handler gets a name
which is a combination of the element name and the event name. This is a good practice.
You don't have to double click to get the empty event handler function. You can
go to the properties section, click the events icon and type an event name in the
Click event setting. When you press enter the design view will switch to show an
empty function with the name you typed (unless you typed the name of an existing
function). - In the blank line between the braces { } type:
labHello.Text = "Hello " + txtName.Text;
Note: This code is easier to understand as each element has a name which says what
type of element it is and what its function is. - Save your website and press
the run button.
- The finished page looks and works exactly the same as the original, with the exception
of the title bar of Internet Explorer, which now shows 'Welcome Page' instead of
'Untitled Page'. However, from the developer's point of view it is much easier to
work with. As a page develops you can track what is happening on the page from the
names of the elements.
Try out
Professional
or download the
ZIP version of Professional.