Security & User Authentication
Most information websites allow anonymous access to browse their content. However,
eCommerce and service oriented web sites tend to have pages which should only be
accessible to certain users. For example, Administrators may need to use web based
access to perform maintenance tasks on a site, or information providers may want
to restrict full access to a site to those users who have subscribed to the service.
Also, different classes of user, e.g. Anonymous, Member and Admin roles may be given
access to the site in different ways.
ASP.NET v2.0 provides a comprehensive, built-in mechanism for user authentication
and role management, coupled with user profiling which allows the server to store
and act on information about each user's activities on the website. For example,
a user may customise their user interface by choosing a different theme. This can
be saved in the user's profile so that when they visit the site again they will
pick up again with the same theme.
User management, maintenance and profiling can be done within an application, but
initial security settings are controlled though a Web application administrative
website. The administrative website can not only configure security settings but
also manage user accounts and roles. This makes it easy for the application developer
to setup test user accounts, system accounts and default settings for the site.
VWD also provides a set of controls for building login forms, registration forms
and user management forms into an application. The controls are context sensitive
so that alternative content can be displayed depending on the role of the user.
For example, an anonymous user would get a login form and a link to a registration
form on the pages they see, but once logged in the user interface would remove those
features and display their login status together with a new set of links in the
menu. Administrative users would get further menu choices once logged in. The menu
system is adapted to the user by using the Roles attribute for each page in the
sitemap.
User based management and control is performed using an underlying database
containing user information, password and role information. This database is
created automatically by VWD through the Website administration site,
however, in a real situation the developer would specify a security database
which would be maintained on a database server.
Overview of the process
Before we look at configuring security and producing user interface elements in
detail we will take an overview of the processes. Initial configuration of the security
aspects are done independent of your web page design and if you have used a
structured approach to holding your web content (i.e. with different
sections of your site in different folders) security can be added late in
the development process, thus simplifying testing. The following steps are required:
- Organise the folders for your web application in a logical way - different types of user
will access sections of your site in different ways so choose folders
accordingly.
-
Run the Web Site Administration Tool and configure it to use a security database.
The default works for development but it will need deploying on an
appropriate database system eventually.
-
Enable forms (Internet) authentication.
- Create some test users.
- Create
the roles associated with different type of user.
- Set access rules for each
role to the different folders.
- Modify the application configuration file to
enable security-trimming of menus.
Once you have security setup you can build in membership and login functions into
your web pages.
- Modify the sitemap for your website to include role information. This will allow
the system to trim menus when the user does not have permission to access some of
the pages in the site.
- Include a LoginView control on your pages to allow
you to display different information for anonymous and logged in users.
- Include
a Login control on the anonymous pages so that a user has the opportunity to login.
-
Include a login status control on pages which need to display information about
the logged in user.
- Create a registration page so that users can register
to use the website.
- Create a user profile page so that users can
edit
their own account.
An important point to note is that security elements are independent of
the functionality of the site and so do not necessarily have to be designed
into the menu system for your application.
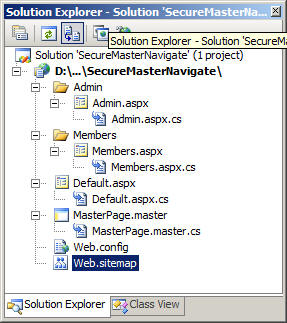
Step by step
The starting point for this exercise will be a three page site with the following
structure:
- Create a new C# ASP.NET Empty Web Site called SecureNavigate.
- In the Solution
Explorer create two new folders called Members and Admin.
- In the root folder create a new MasterPage and build a simple page
structure as follows:
<body>
 <form id="form1" runat="server">
 <div id="container">
  <div id="header">
   <h1>Secret Society</h1>
  </div>
  <div id="navcontainer">

  </div>
  <div id="content">
  <asp:ContentPlaceHolder
           ID="ContentPlaceHolder1" runat="server">
   <h2>Subtitle here</h2>
   <p>Dummy content</p>
  </asp:ContentPlaceHolder>
  </div>
 </div>
 </form>
</body>
- In the root folder create a new web form called default.aspx using
your master page
- In the Members folder
add a new item of type web form called Members.aspx using your master
page.
- In the Admin folder add
a new item of type web form called Admin.aspx using your master page.
- Add a sitemap file and edit
the text to look like this:
<?xml version="1.0" encoding="utf-8" ?>
<siteMap xmlns:  ...   >
  <siteMapNode url="~/" title="dummy" >
    <siteMapNode url="~/default.aspx" title="Home page" />
    <siteMapNode url="~/admin/admin.aspx"
                 title="Admin page" />
    <siteMapNode url="~/members/members.aspx"
                 title="Members page" />
  </siteMapNode>
</siteMap>
Your solution explorer window should look like this:
- Open your MasterPage, drop a BulletedList in the 'menu' <div> and
configure it to use your site map. Use the example from the earlier
session on navigation to help with this.
- Add a style sheet to layout the pages with a side menu as in the
master pages session.
- Add a subheading to each of your pages and some dummy content to
distinguish each page.
- Run the project and you should be able to navigate to the three pages.
Note: You are now at the stage you were with the master page navigation
example, except you have your pages organised into folders (except the
home page).
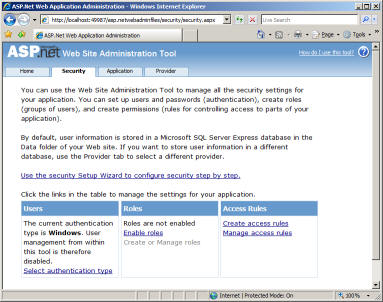
- From the menu choose Website | ASP.NET Configuration.
- This launches a
web based wizard for configuring security and membership.
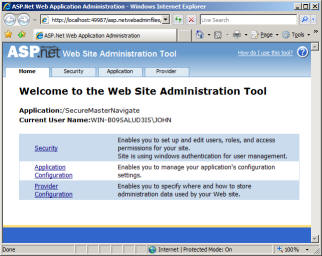
- Click the 'Security' tab.
The next stage is to set security, by setting the authentication model for the application
and creating users, roles and access rights.
- Click 'Select authentication type'.
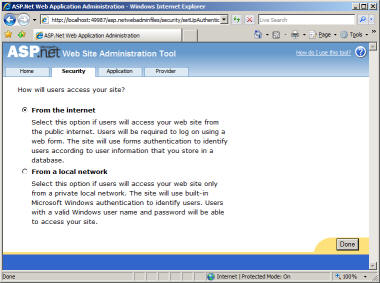
- Choose 'From the Internet' and click done.
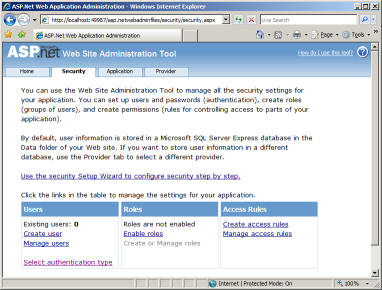
You should note that now the Users section of the page is listing the
number of users. This is because the web application is going to control
the authentication, rather than the operating system. It is possible to
build an Intranet application which uses built in Windows authentication
but we will not look at this.
- It is now possible to create Users. Before we do that
we will enable Roles by selecting Enable roles.
- Press Create roles.
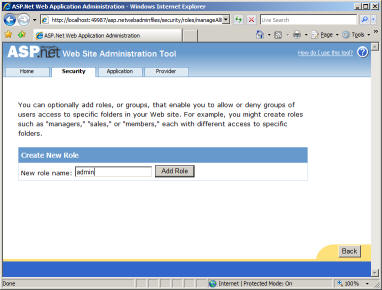
- Type Admin for the New role name and click Add Role.
- Type Member for
the New role name and click Add Role.
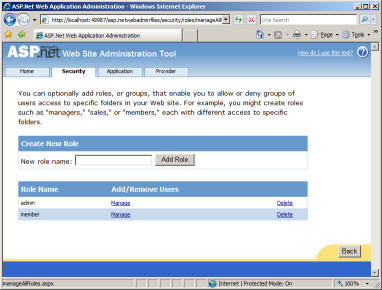
- Click
Back and click Create User
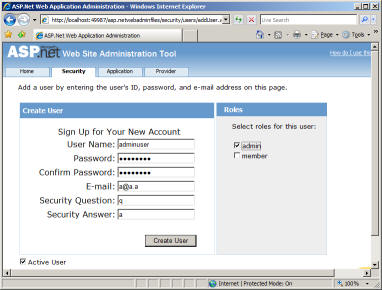
- We need to add two test users. One can be called adminuser and the other can be
called memberuser. Use 'P@55word' for the password, 'q' for the security question
and 'a' for the security answer. Type in a dummy email address such as [email protected] and [email protected] for the
users. Make sure you select the admin role for adminuser before pressing Create
User, and press Continue to allow you to create another user. Make sure you select
the member role for memberuser before pressing Create User. Now click Back. Note
that if you make a mistake when creating users it is awkward
to go back and change them you will need to delete the user and
go through the process again.
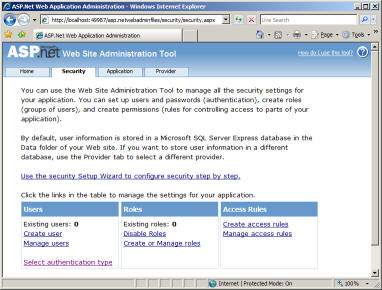
You should now see that you have 2 users defined and 2 roles defined. We now need
to associate each role with permissions to use the different bits of the site. A
user with role admin will be able to access all areas of the site. A user with role
member will be able to access the home folder and the members folder.
- From the Security page click Create access rules.
- Adding roles is tricky, so make sure to select all options
in turn. (The web interface does not show the current information clearly.) Select
the SecureNavigate directory (this is the home directory).
Select 'All users' and select 'Allow'. Click OK.
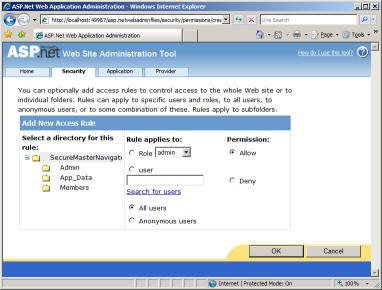
- Select Create access rules. Select the Admin directory, select
Role 'Admin'
and select 'Allow'. Click OK.
- Select Create access rules. Select the Admin directory, select 'All users' and
select 'Deny'. Click OK.
- Select Create access rules. Select the Members directory, select
Role 'Admin'
and select 'Allow'. Click OK.
- Select Create access rules. Select the Members directory, select Role 'Member'
and select 'Allow'. Click OK.
- Select Create access rules. Select the Members directory,
select 'All users' and
select 'Deny'. Click OK.
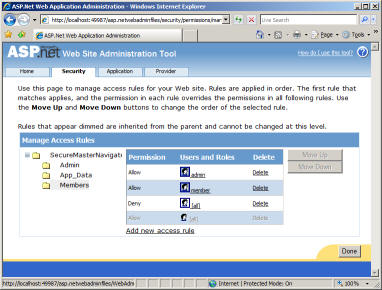
- If you select Manage Access Rules you can choose a folder and see a
summary of your defined rules. e.g. rules for the Member role:
- Close the ASP.NET Configuration
web page.
Security has been set now on the pages. If you run the application you will be able
to browse to the home page, but if you try to browse to the admin page or the members
page you will see an HTTP Error 404 page (The resource cannot be found).
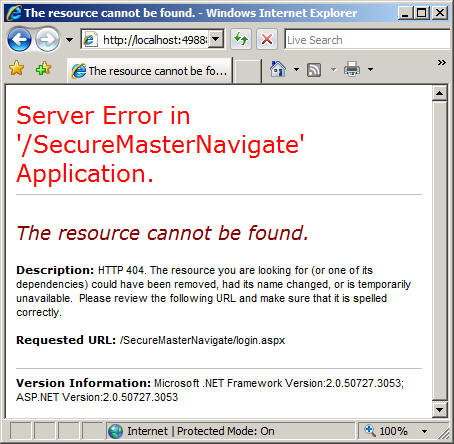
This is because the system knows that to be able to access the admin and member
pages the appropriate user needs to be logged in. The system will by default attempt
to call a page called login.aspx, to attempt to authorise the user. All we need
to do is provide a new web form called login.aspx with a Login control on it.
- In Solution Explore right click on the application
and choose Add New Item ...
- Choose Web form and select your master page and name it login.aspx
- Drop a Login control onto the form.
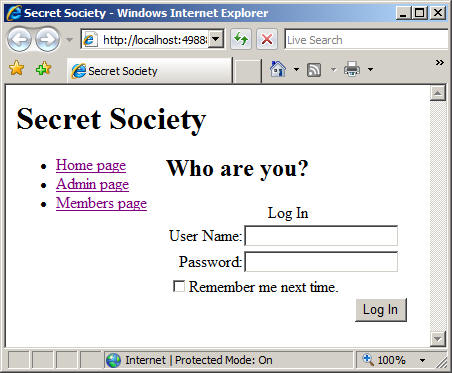
- Save the page, switch to default.aspx and run the application.
If you try to access the admin page or the members page a login form will appear.
This will happen even if you try to access the pages directly by typing in the URL.
The next stage is to set the menu system so that it does not offer pages which are
not accessible. This is called menu trimming. We will also need a Login control
on the home page (and maybe other pages) to allow people to login and see the full
set of menu options for their role. We will add a login form on the home page first.
Menu Trimming
Menu trimming cannot be done from the VWD user interface. It requires some settings
to be changed in the Web.Config file for the application. Web.Config is an XML file
which lists all the configuration information for pages in an application folder.
Your application should have three Web.Config files; one in the home directory and
one in each of the admin and members directories. The files in the admin and members
directories have configuration information for access rules. For example, the Admin
directory Web.Config looks like this:
<?xml version="1.0" encoding="utf-8"?>
<configuration>
   <system.web>
       <authorization>
           <allow roles="Admin" />
           <deny users="*" />
       </authorization>
   </system.web>
</configuration>
As you can see it contains an authorization section where only role 'Admin' is allowed
access and all other users ('*') are denied access.
The Web.Config file for the application home folder is more complex. It contains
configuration information for the whole application, including database connections,
authorisation and membership information etc. We need to add a new configuration
section for the sitemap by providing a named connection to the sitemap (mySiteMap)
and configuring it to trim menus based on security information (securityTrimmingEnabled).
This also needs to be linked to the menus on each page.
The XML for the sitemap configuration looks like this.
<siteMap defaultProvider="mySiteMap" enabled="true">
    <providers>
       <add name="MyXmlSiteMapProvider"
            type="System.Web.XmlSiteMapProvider, System.Web,
                        Version=2.0.3600.0, Culture=neutral,
                               PublicKeyToken=b03f5f7f11d50a3a"
            securityTrimmingEnabled="true"
            siteMapFile="Web.sitemap"/>
   </providers>
</siteMap>
- Open the Web.Config
file in the home directory and find the start of the system.web
section (<system.web>).
- Copy the XML for
the siteMap section from above into the XML file, immediately after the <system.web>
line.
- Open each of
your web pages, select the SiteMapDataSource control and set the SiteMapProvider
property to MyXMLSiteMapProvider.
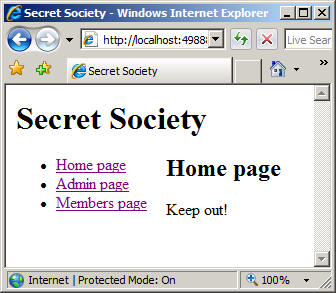
We now have a system which uses security information to trim the menus based on
the login status of the user. If you run the application now you will see
that the home page only has a single menu entry.
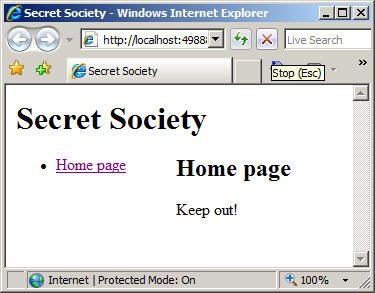
Anonymous users are unaware that there are any other pages in the site. If
you type in the URL of one of the restricted pages you will be made to login
and once logged in the menu will contain all the pages that you are entitled
to see. Download a
ZIP version of SecureNavigate.
Give users the option to login
In some circumstances you don't need anonymous users to know about logging
in, e.g. the public page for an otherwise private site, however, in the
majority of cases there ought to be a facility to login. The simplest
approach is to put a login control either on the home page, or in the master
page.
The user can login from the home page and therefore access the appropriate
sections without having to know the URLs directly.
The above processes may seem complex, however, by taking advantage of Master pages
to build the user interface for your pages you only need to set up the properties
once. The menus and login forms are built into the master page.
A property of the Login control is VisibleWhenLoggedIn. If you have this property
set to 'false' for the login form on the home page the user will not see the login
form once they have logged in.
More login based controls
The Login control we used in the previous section provides a one way access mechanism.
I.e. it allows you to login, but it does not allow you to logout. We also sometimes
want to modify our user interface based on the type of user which is currently logged
in. The previous section allows us to modify the set of web pages we can see from
a menu, but sometimes we may want a web page to be accessible to everyone, but to
display different information for different users. We may also want to provide a
mechanism for users to register themselves and to be able to manage their own accounts
(e.g. change a password).
The Login section of the toolbox, contains a set of controls which give you this
flexibility. The following sections will describe each control with simple examples
of their use.
LoginStatus
The LoginStatus control has two views (and LoggedOut view and a LoggedIn view).
If there is no user logged in the default is for the LoginStatus control to show
a
Login link. When logged in the control displays a Logout link. The default behaviour
of the Login link is to call the login page (login.aspx). This control therefore
provides a simple mechanism to control users logging in and out, and so there is
no need to have a login form on any page other than login.aspx.
CreateUserWizard
This control provides the user interface to allow a user to register themselves
on the user database. The user will by default be active, but have no roles allocated.
By default the user will be logged in when their account is created, but there is
a property to disable this. You can use the CreatedUser event to add code to allocate
roles to the user once their account is created. E.g. the code to add a user to
the 'Members' role and to disable their account is:
    void CreateUserWizard1_CreatedUser
                (object sender, EventArgs e)
    {
        MembershipUser User;
        User = Membership.GetUser(CreateUserWizard1.UserName);
        User.IsApproved =
                false; // change to true for automatic approval
        Roles.AddUserToRole(User.UserName, "Member");
        Membership.UpdateUser(User);
    }
LoginName
We sometimes want to include the account name of the logged in user on the web page.
The LoginName control allows just that. If a user is not logged in the control displays
nothing.
ChangePassword
This control displays a form which allows the user to change their password. The
user must provide their old password and type the new password twice.
PasswordRecovery
This control displays a wizard form which allows the user to request their password
be emailed to them. The user must submit their email address, and answer their security
question. However, this control requires that the security is setup using
reversible password encryption, which is less secure. A more complex
approach is needed if you want a high degree of security.
LoginView
This control provides the most flexibility. It acts as a set of containers for other
controls and web content. There are by default two containers; one for anonymous
users and one for logged in users. If you put different controls into the two containers
the page will change depending on whether the user is logged in or not. For example,
you could put a simple text message in the Anonymous container which reads 'Please
log in', and you could put a message 'Logged in user: ' and a LoginName control
in the LoggedIn container.
However, the flexibility of the LoginView control does not end there. You can add
containers to the LoginView control based on Role Groups. The Smart Tag dialog allows
you to edit role groups. You define lists of roles which you want to have the same
content. E.g. in our application from the preceding section we would have one role
group containing just the role 'Admin' and another role group containing just the
role 'Member'. This would give us two more containers for web content. Once we have
role groups added we can edit the content by dragging controls and typing into the
container. When the application is running, logged in users who aren't in a role
group would get the LoggedIn container, and anonymous users would still get the
Anonymous container.
Using this control you can create customised content based on the status of the
user without having to write any code.