Viewing Table Data
Several controls are available for getting data onto a page. All of them
offer extra functionality for editing data, but we will look at this in the next
part of the tutorial. Some of the controls are designed for viewing a whole
table or the results of a query, whereas others are designed for the display of
only one record at a time.
The simplest control is the GridView and we will look at how to use the GridView step
by step to reinforce some of the concepts.
Step by step
- In Windows Explorer make a copy of your StockControl web application folder
and name it GridView.
- Run VWD and open the GridView website
- Open default.aspx in design view
- Drag a GridView from the Data section of the Toolbox onto
your page.
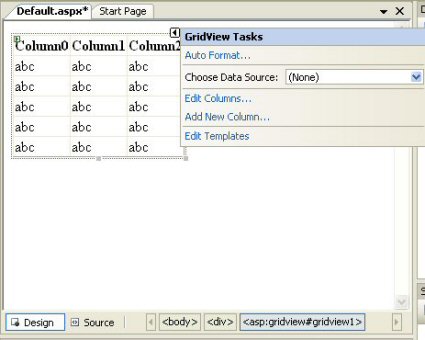
- The GridView Tasks dialog should appear
automatically, but if not click the small black arrow at the top right of
the GridView control. Now from the Choose Data Source dropdown list select
<New Data Source>.
- In the Data Source configuration Dialog choose Database
and change the ID to sqldsStock. (We are professionals and we always
rename our elements.)

- In the Configure Data Source - sqldsStock dialog choose
the data connection from the list (there should only be one), and click
Next.
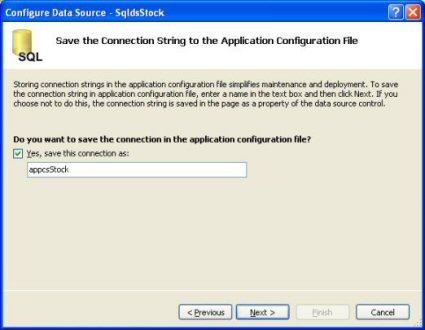
- In the next page of the wizard change the name of the
connection to appcsStock and click Next.
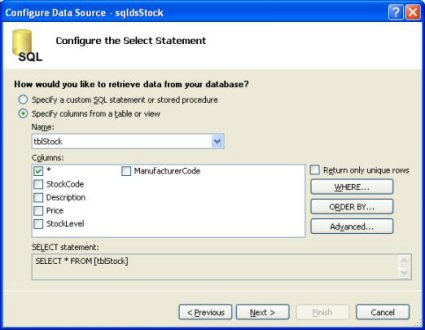
- In the next page of the wizard choose tblStock from the
name drop down list and select the * column. Now click the Advanced
Options buttons.
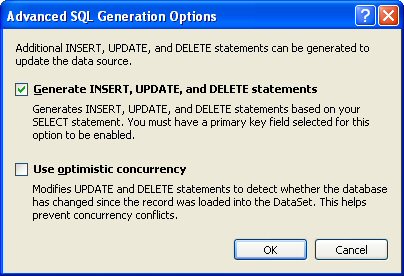
- In the Advanced SQL Generation Options dialog select the 'Generate
Insert, Update and Delete statements' checkbox and press OK, then click
Next
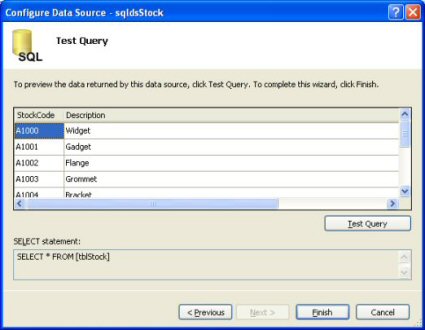
- On the next page you can click Test Query to see whether
your connection works. If you are satisfied that it is working click
Finish.
- If you didn't type any data into your tables, perhaps now
is the time to do it so that you will see some data when you run the
project. Save your project and select Run. The project will eventually run
and you will see a web page with the data from your Stock table in a
simple grid.
Try the
Gridview application,
or download a
ZIP version of Gridview.
Alternate controls for viewing data
The ListView control
ListView is new in version 3.5 of ASP.NET and is a logical progression
from the GridView, where additional automated functionality is provided. You
can experiment with it yourself. It comes into it's own when you need full
table editing functionality and the tutorial will look at this in the next
page.
The DataList control
Repeat the GridView process above with a new website, called DataList, but use a DataList control rather than a GridView control. The DataList allows more
control over the layout of each record, although the default simply presents
each record as a vertical column of Field Name and Field Value pairs. The DataList
control is very flexible and caters for multi-column layout however, it does not provide any automatic editing
functionality. Use the Edit Templates feature from the Smart Tag to control
the layout of each record.
We will not develop the use of DataList controls in
this course.
Try the
DataList application
or download the
ZIP version of DataList.
The Repeater control
The Repeater is more complicated to use, but is more flexible. The
other two can be edited in design view using templates and the GridView can be configured
to do editing etc, without having to write any scripts. The Repeater control
has to be edited in Source view, but does give you the flexibility to control
exactly how you want each record displaying. The simplest code you can get away
with is as follows:
- In Windows Explorer make a copy of your StockControl application and name
it Repeater.
- Start VWD and open the Repeater Website.
- Start with the blank page and add a Repeater control.
- Configure the Data Source as with the previous two
examples.
- Switch to Source view.
- Find the
<asp:Repeater> element and insert an
<ItemTemplate> element as follows:
<asp:Repeater ... >
  <ItemTemplate>

  </ItemTemplate>
</asp:Repeater>
- Inside the ItemTemplate tag you insert the XHTML code for
a single record and a special tag for each field within the XHTML. In the
example below four fields are inserted, separated by commas, with a line
break at the end.
<asp:Repeater ... >
  <ItemTemplate>
    <%# Eval("StockCode") %>
     ,
    <%# Eval("Description") %>
     ,
    <%# Eval("Price") %>
     ,
    <%# Eval("StockLevel") %>
    <br />
  </ItemTemplate>
</asp:Repeater>
- If you switch back to design view you will see an approximation
of what the data will look like, but you cannot edit the layout in Design
view.
Try the
Repeater application,
or download the
ZIP version of Repeater.
As well as the <ItemTemplate> element there are templates allowing you to
display alternating items differently, record separators, headers and footers. The
following source shows how to list all the StockCodes separated by '|' on a single
line.
<asp:Repeater ... >
  <HeaderTemplate>Stock Ids: </HeaderTemplate>
  <ItemTemplate>
    <%# Eval("StockCode") %>
  </ItemTemplate>
  <SeparatorTemplate> | </SeparatorTemplate>
</asp:Repeater>
The templates can contain any valid XHTML, giving you the ultimate flexibility to
create a page layout. Try this
alternative Repeater
application or download the
ZIP version of the alternative repeater.
We will not develop the use of the Repeater control any further in this
tutorial.
The DetailsView control
This control is similar to the GridView control and is
configured in the same way. However, this control only displays one record at a
time. It can be configured easily to allow edit, insert and delete operations
on table data. Try the simple example
of
DetailsView
or download the
ZIP version of DetailsView.
The FormView control
This control is similar to the DataList control except that
it only displays one record at a time, and like the DetailsView control it can
be configured to allow edit, insert and delete operations, however, it is more
complex to configure. The
following source shows how to create a simple template to display a single field
from the current record.
<asp:FormView ...>
  <ItemTemplate>
    <p>Description: <%# Eval("Description") %></p>
  </ItemTemplate>
</asp:FormView>
Try the simple example of
FormView
or download the
ZIP version of FormView.
We will not develop its use in this course.
Paging and Sorting Data
The basic controls for displaying data have a great deal of
flexibility in the way they can be configured from the properties pages. A
common requirement is to be able to display tabular data containing large
numbers of records in a manageable way. Pagination is the mechanism by which
the web page displays a limited number of records at any one time and provides
navigation links to scroll up and down the data, or directly to a specific
page. Coupled with this is the need to display data sorted by different
criteria. Pagination and sorting are both provided by simple property settings.
However, in this section we will look at other settings and configuration
options which enhance the user interface. We will use the GridView control for
our examples. The other controls use a similar mechanism, but may need more
effort to get them to work.
Pagination
Open the GridView website in VWD. If you select the GridView control and look at its
properties you will see a Paging Section. The two basic properties are AllowPaging and PageSize. Set these to true and a number respectively to break
the table display down into chunks of a specified number. The default setting
provides a numeric page navigation scheme with text links at the bottom of the GridView. More control over the navigation is provided through the PagerSettings property which has lots of sub-settings. These control text and
image/icon based navigation, and alternative schemes such as Previous/Next
rather than numeric page numbering.
Note: DetailsView and FormView only display a single record. Paging is a simple
mechanism to allow scrolling through the records.
Sorting
If you set the AllowSorting property to true on the GridView control a link is placed
in the header for each column. Clicking a link causes the page to refresh with the
table data sorted by the chosen column. A second click reverses the sort order.