Creating Consistent Websites
One of the most important characteristics of a usable website is consistent layout.
If a user is presented with a collection of pages with different layouts, menu choices,
colours etc. it become difficult to work with. A website designer should strive
to create a design which encompasses the entire site, with perhaps minor thematic
changes for different sections. To assist in achieving this ASP.NET 2.0 introduces
the concept of master pages.
A master page is a web page which is created using the Master page template and
is saved with file extension .master. To all intents and purposes is looks just
like an ordinary ASP.NET web page with one important difference: you can place content
place holders on a master page which will get replaced by custom content when you
start developing your actual pages. A master page will have one or more ContentPlaceHolder
controls on it. When a page is created using the master page as its template each
ContentPlaceHolder gets replaced by a Content control. The designer can modify the
Content control to provide the distinct content for the page.
Step by step
Before you start you must have a clear idea of the layout of the pages on your site,
preferably with a visual design. This is used to form the basis for your master
page.
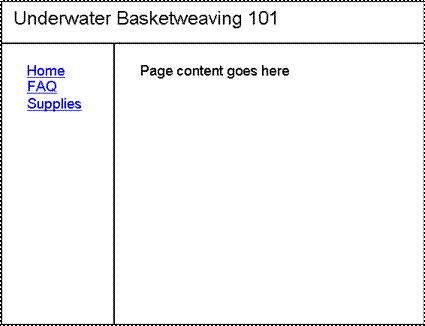
For the purpose of this example the following design will be implemented:

The layout will be implemented using three <div>s and a simple stylesheet
to position the content.
- Create a new C# Empty Website called MasterPages.
- Select File | New File ...
- Choose Master Page from the list and click
Add.

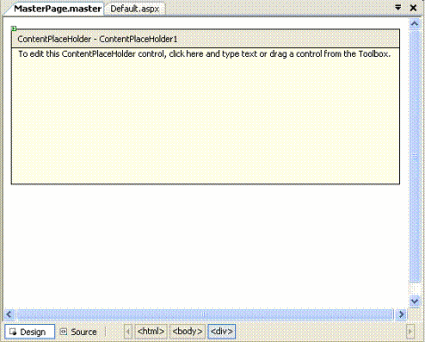
You will see a web page with a large ContentPlaceHolder on it. This will become
the part of your web pages that contains the information. You need to build the
design of your web page around this ContentPlaceHolder.
- Switch to source view and you will see:
<%@ Master Language="C#" AutoEventWireup="true"
    CodeFile="MasterPage.master.cs" Inherits="MasterPage" %>
<!DOCTYPE html PUBLIC "-//W3C//DTD XHTML 1.0 Transitional//EN"
     "http://www.w3.org/TR/xhtml1/DTD/xhtml1-transitional.dtd">
<html xmlns="http://www.w3.org/1999/xhtml" >
  <head runat="server">
    <title>Untitled Page</title>
    <asp:ContentPlaceHolder
        id="head" runat="server">
    </asp:ContentPlaceHolder>
  </head>
  <body>
    <form id="form1" runat="server">
      <div>
        <asp:contentplaceholder
            id="ContentPlaceHolder1" runat="server">
        </asp:contentplaceholder>
      </div>
    </form>
  </body>
</html>
Note: there is a second
ContentPlaceHolder in the <head> of the page, with
id="head". This is used for adding page specific content
to the head of the page, for example, metadata.
- Modify the content of the <div> element to include three <div>s with
the <asp:contentplaceholder> inside the third <div> as follows.
<div>
  <div id="header"></div>
  <div id="menu"></div>
  <div id="main">
    <asp:contentplaceholder
        id="ContentPlaceHolder1" runat="server">
    </asp:contentplaceholder>
  </div>
</div>
Note: you may also want to set the 'id' of the outer <div>
(e.g. id="container") so you can control the appearance of the page using
your stylesheet.
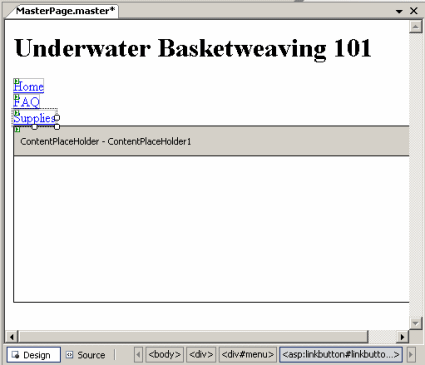
- Put the heading <h1> with content 'Underwater Basketweaving 101' in the
<div> with id="header".
- Put three LinkButtons into second <div> (id="menu"), with text 'Home', 'FAQ' and 'Supplies'.

- Add a New Item of type stylesheet to the project and add the following code:
#menu
{
  width: 150px;
  float:left;
}
#main
{
  margin-left: 160px;
}
- Open your master page in Source view and drag the style sheet file onto
the code immediately after the <head runat="server"> tag in the master page. A line similar to the
following will be added to your master page, but you must make sure it is in
the correct place:
<link href="StyleSheet.css"
                    rel="stylesheet" type="text/css" />
An alternative method of adding the style sheet is
to use the style manager, but this will add the style
sheet link at the end of the <head> section. This may not be the best place
when creating a master page. - Save the page, and close it.
- Select File | New File ...
- Choose Web Form, select the checkboxes at the bottom labelled 'Place code in separate
file' and 'Select master page', make sure the page name is Default.aspx and click
Add.
- Select MasterPage.master in the following dialog and click OK.

-
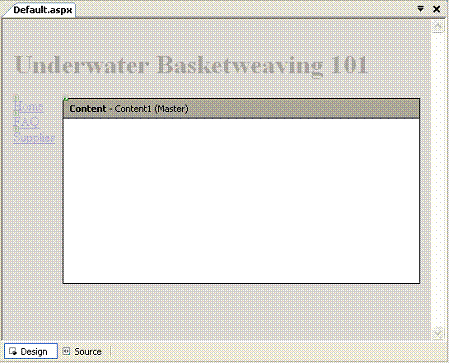
When the page opens you will see that the layout is greyed out, and the only area
you can modify is the content of the Content control on the page. Type some simple
text into the Content, e.g. This is the home page!!.
-
If you look at the Source for the page you will see it doesn't have any
of the outer bits of XHTML, just a <%@ Page> tag and an <asp:Content>
element to hold the actual page content.
<%@ Page Language="C#" MasterPageFile="~/MasterPage.master"
         AutoEventWireup="true" CodeFile="Default.aspx.cs"
         Inherits="_Default" Title="Untitled Page" %>
<asp:Content ID="Content1"
             ContentPlaceHolderID="ContentPlaceHolder1"
             Runat="Server">
  This is the home page!!
</asp:Content>
- Put your page content in this section and save the file.
- Repeat steps 11 to 16 to create two pages called FAQ.aspx and Supplies.aspx.
- Open the Masterpage and for each of the LinkButtons
use the Properties pane to set its PostBackUrl to the appropriate
page using the file selector.
- Save your project and run it.
Download the
ZIP version of the MasterPage application.