Make your page an ASP.NET page
If you are creating an ASP.NET web application you will already have
a page (or even a Master Page) ready to accept the web service user
interface elements. However, if you are working with a predominantly
static site using a Dynamic Web Template you will need to build at least
one page into your site which is an active page. This section tells you
how to make a static page based on a dynamic web template into an
ASP.NET page ready for the following stages. If you want to create an
active site with the web service linked on every page you should use
Visual Web Developer or Visual Studio to create a Master Page and use
the features in that. We will look at making one page within your static
site into an active page which can call a web service.
Step 1: Rename the page
Use the Web Site tab to locate your page and rename it with the
extension .aspx
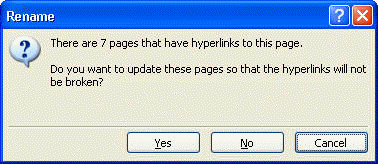
At this point you should be faced with this dialog:

Accept the offer and all your linked pages (including your template)
will be update to point to the newly named page.
Step 2: Add the ASP.NET Page directive to the top of your page
All ASP.NET pages have an extra line above the DOCTYPE directive
marking them as ASP.NET pages. The basic form of this is shown below:
<%@ Page Language="C#" AutoEventWireup="true"
         CodeFile="Default.aspx.cs" Inherits="_Default" %>
Add this line to the top of your new .aspx page.
Step 3: Add the ASP.NET form to your content
This step is more tricky. We need to add a <form> element to our .htm
page.
The code that needs to be added is:
<form runat="server" id="form1">

</form>
Locate the editable content for your page and place the form element
around it, but not around the editable content comments, as follows:
... top bit of your template
<!-- #BeginEditable "body" -->
<form runat="server" id="form1">
   ... all your existing page content is here ...
</form>
<!-- #EndEditable -->
... bottom bit of your template
Step 3: Make a C# file ready for accepting the code
Although it is possible to write the code to make the web service
work inside the .aspx file, it is preferable to keep the code in a
separate file (referred to as a code behind page). If you are using the
web service on your template
You can start with a dummy page and make modifications. Paste the
following code into an empty text file and save it with the filename
default.aspx.cs in the same folder as your web page:
using System;
using System.Data;
using System.Configuration;
using System.Web;
using System.Web.Security;
using System.Web.UI;
using System.Web.UI.WebControls;
using System.Web.UI.WebControls.WebParts;
using System.Web.UI.HtmlControls;

public partial class _Default : System.Web.UI.Page
{
  protected void Page_Load(object sender, EventArgs e)
  {

  }
}
Step 4: Add your active user interface elements
In the previous session you identified the user interface elements
for your page. You can now add these to you page using the <asp:xxxx>
elements from the toolbar. You should give all elements an appropriate
name so that you can connect them from code, as described later in this tutorial.