picpick - Image upload and browsing
picpick is a sample application to demonstrate how to handle the uploading
and display of images within a web based application. The application will have
the following features:
- Ability to upload photographic or other JPEG images, together with a title
and brief description.
- Ability to browse image thumbnails.
- Ability to retrieve the full-size image.
Download the sample application
Planning
We will need to solve some underlying problems posed by the functional
requirements.
- We must make sure that only JPEG images are uploaded.
- We will need to upload the original image and create a thumbnail version
(we don't want to require the client to upload two files).
- We need to handle possible naming clashes with uploaded files (so we can't
use the filename as the key in our database).
Database and image file storage
We will hold details of uploaded image in a database table, and the images
will be stored in a folder within the application. Thumbnails will be stored in
a separate folder within the application.
Our folder structure looks like this:

To resolve the unique key problem we will use an integer key field, set as an
identity field (autonumber is MS Access terminology). To simplify data handling
we will rename the uploaded image using the integer key as the filename, with
.jpg extension of course. We will retain the original filename as a data field
in the database. The table structure for tblImages looks like this:

After uploading a couple of images we would expect our folder structure and
table to look something like this:


Creating the image browsing page
Let's do the simple bit first. Assume we have entered the above data and
files manually. We can now create a simple webpage to display the tblImages
database table. We will use a gridview for simplicity. We will first drop a
Gridview on our web page and link it to the table with default selections. Our
page will look something like this when we run the application:

The next task is to prepare for displaying the thumbnail image in the grid.
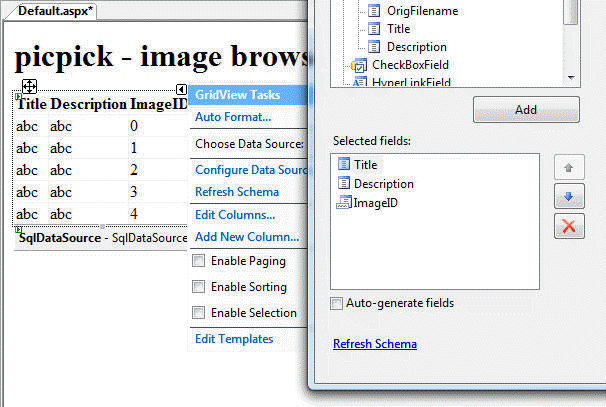
We will use the smart tag in the designer and choose Edit Columns …
We want to display the title and description followed by the thumbnail image. We
won't need the OrigFilename field, but we will need to modify the ImageID field
to make it display an image and move it to the right hand column. Notice in the
screenshot below how the
ImageID field has changed to be a template field after selecting the 'Convert
this field into a TemplateField' link:
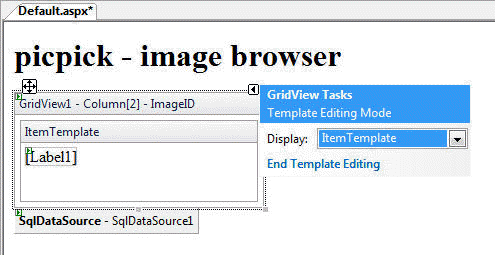
We now need to choose Edit Templates so we can replace the default label in
the ImageID column into an image. See the default template for the ImageID
field:
We could delete the Label1 element and add an Image element from the Toolbox,
and leave adding a link to the image until later. However, ASP.NET provides us
with a Hyperlink component which automatically allows us to use an image with
alternative text as its link object. So we can just drop a Hyperlink component
into our template and enter the Data Bindings.
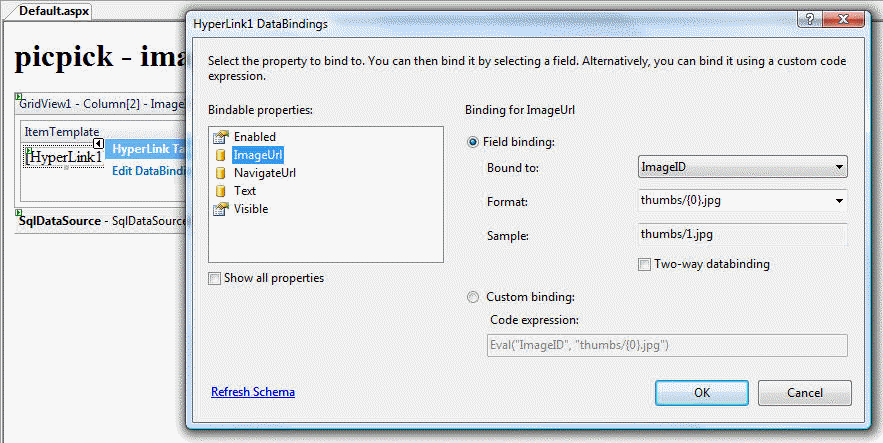
First we can choose Text (which maps onto the alt text in the image) and
choose Title from the Bound to: drop down list. The ImageURL field is slighly
more complex as we need to use the ImageID and build a URL from it in the
format: thumbs/nnn.jpg, where nnn is the image ID. We achieve this using the
Format: drop down list. Choose the General - {0} entry and modify it to look
like this:
We are nearly done. We now need to set the NavigateURL property. This follows
the same process as for the ImageURL property, except that the URL will be in
the format: images/nnn.jpg, so the Bound field will be: ImageID and the Format:
will be images/{0}.jpg
If we run our application it now looks something like this:
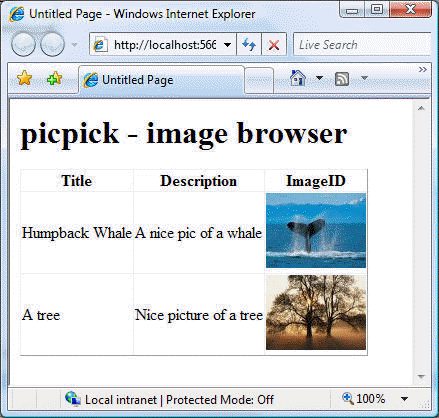
Clicking on a thumbnail takes us to a new page containing just the image. We
would need to do a little more work to make it link to a proper web page with
the full-size image in it, but nothing on this page would change significantly,
just the Format for the NavigateURL property, which would look something like
this: showpic.aspx?img={0} We then create a new page called showpic.aspx with
all the trimmings on it and an Image object somewhere about. We simply add code
into the Page_Load function to set the Image's ImageURL to the image in
the query string:
Image1.ImageUrl =
               "images/" + Request.QueryString["img"] + ".jpg";
The downside of this is that the image will not have alternate text, unless
we set some default value on the page. Preferably we would pass the Title of the
image across to the showpic.aspx page so we could set it correctly for each
image. To make this work we have to do more major surgery to the Format: of the
NavigateURL property. We need to set it to be a custom binding and add in the
extra field, as follows:
Eval("ImageID", "showpic.aspx?img={0}&alt=") + Eval("Title")
We then need to add another line into the Page_Load function to set the
AlternateText property on the Image.
Image1.AlternateText = Request.QueryString["alt"];
Todo list
Some extra enhancements which may be nice in a more realistic application
would be:
- Make the description into a template field and make it multiline text
(either by using a TextBox set to read only, or putting a Literal inside a <p>
element.
- Make the layout for each picture more flexible by using a DataList or a
Repeater.
- Add extra fields into the database to allow for extra details such as Date
taken/uploaded, Camera, Lens, Exposure etc.
- Have three files for each image - a thumbnail, a web page size one (with a
watermark) and the original (with secured access, e.g. by login).
Uploading files
So - we can now display sample data and images entered manually into our
application. We now need to provide a form allowing us to add new images
remotely. We will look at this in several stages:
- Create a form with input fields for selecting a file to upload and
entering data in our database.
- Add validation to the form to reduce errors on the client side.
- Add code to enter data from the form into the database, and retrieve the
ID of the new image.
- Save the uploaded image into the Images folder
- Convert the image into a thumbnail (max width 100px) and save it to the
Thumbs folder.
Let's look at these one at a time.
Creating the input form.
Our form will need a FileUpload component, a TextBox for the Title, a TextBox
for the Description and a Button to initiate the file upload. The diagram show
such a form. The components are named: FileUpload1, txtTitle, txtDesc and
Button1. We could lay this out inside a nicely laid out page template, but in
our case we have a simple user interface with just a heading and a link back to
the home page. Our form looks like this when running:

Validating input
Our database is set up so that each image record must have a filename and a
title. The description can be left blank. We are going to need a
RequiredFieldValidator for FileUpload1 and for txtTitle with suitable error
messages. If we set the Display property of the validators to Dynamic the error
messages will not seem to spring up in thin air when the user makes an error.
Also we should restrict the user to choosing JPEG files. So we should have a
filename which always ends with either .jpg or .jpeg (upper or lower case mix).
We can check this with a RegularExpressionValidator. A quick search of the
Internet with Google reveals several possible expressions for check this. With a
bit of tweaking/testing the ValidationExpression property is set to:
.+\.([jJ][pP]([gG]|[eE][gG]))
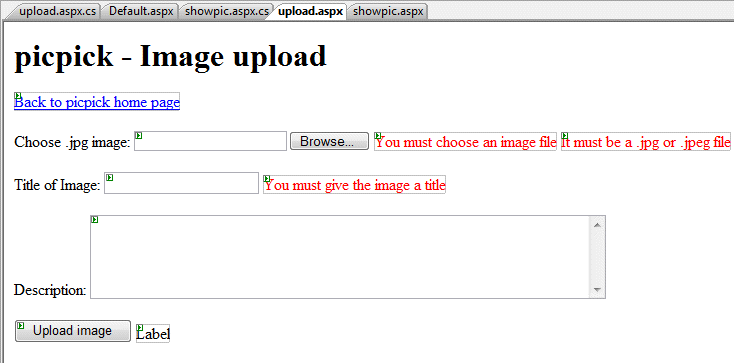
The FileUpload control checks whether the file actually exists, so this
expression just needs to check the extension. Our form now looks like this (in
design view):
Adding the record to the database
We have had to hand craft the input form, so unfortunately we have to hand
craft the code to perform the insert into the database. Even if we could take
advantage of a DetailsView or a FormView control to handle the input, the
requirement to retrieve the ID of the image would cause us problems. When we
insert a new record into the table it gets an automatically generated ID for the
key. This key is required so we can save the images with the corresponding
filename. However, if we perform the INSERT automatically (using a DetailsView)
and then try to determine the Key there can be problems. We can't just retrieve
the records using a SELECT statement and choose the highest key because another
user may have just added a record after ours and we would retrieve their ID (and
potentially so would they). We need to perform the INSERT and retrieve the ID in
a single SQL transaction. Fortunately, SQL Server allows us to do this. We can
execute a whole string of SQL statements in a single command, and a SELECT
statement can return the value of an Identity field (Autonumber for you MS
Access bods). The statement looks like this:
 INSERT INTO tblImages(OrigFilename, [Title], [Description])
VALUES (@Filename, @Title, @Description);
SELECT @FileID = SCOPE_IDENTITY();
So, we can see we give our command three input parameters, corresponding to
the data on the input form, and we receive an output parameter which is the
value of the key field - our ImageID. Notice the parameters don't have to be the
same name as the fields. To make use of SQL methods we need to include the
following directive a the top of our code:
using System.Data.SqlClient;
The following code to perform the insert and get the new filename goes in the
Button1_Click event handler:
 SqlConnection conn =
    new SqlConnection
           (ConfigurationManager.ConnectionStrings
                      ["ConnectionString"].ConnectionString);
SqlCommand cmd =
    new SqlCommand(@"INSERT INTO tblImages
               (OrigFilename, [Title], [Description])
               VALUES (@Filename, @Title, @Description);
               SELECT @FileID = SCOPE_IDENTITY();", conn);
cmd.Parameters.Add
   ("@Filename",
    SqlDbType.NVarChar, 250).Value = FileUpload1.FileName;
cmd.Parameters.Add
  ("@Title",SqlDbType.NVarChar, 50).Value = TxtTitle.Text;
cmd.Parameters.Add("@Description",
                   SqlDbType.NVarChar, 500).Value = TxtDesc.Text;
cmd.Parameters.Add("@FileID", SqlDbType.Int, 4);
cmd.Parameters["@FileID"].Direction = ParameterDirection.Output;
conn.Open();
cmd.ExecuteNonQuery();
string filename = cmd.Parameters["@FileID"].Value.ToString();
conn.Close();
Notice, we now have a string which contains the new ImageID/filename to be
used for the uploaded file. If our database had more fields and/or different
field types we could edit the SQL command to match and add/edit parameters and
field data types.
Saving the uploaded file
The FileUpload component has a method called SaveAs which takes a string as a
filename. We just need to work out the actual location of the images folder in
the application on our server and add the filename and the extension .jpg. We
can then call the SaveAs function. This can all be done in one statement:
 FileUpload1.SaveAs
             (Server.MapPath("~/Images/") + filename + ".jpg");
Converting the file to a thumbnail and saving it
ASP.NET provides good support for image processing and manipulation as well
as file handling. We can add the following directives to the top of the code
file to provide this support:
 using System.Drawing;
using System.IO;
The sequence of events needed to produce and save a thumbnail image is:
- Get the uploaded image as a data stream held in memory
- Recreate an internal Image object from the stream
- Get the original dimensions and calculate a new size, with a width of 100
pixels.
- Get a new Image object by calling the built in GetThumbnailImage function
of the .NET Image object.
- Use the built in Save method of the Image object to save the new thumbnail
to the Thumbs folder.
The code looks like this:
 MemoryStream str = new MemoryStream(FileUpload1.FileBytes);
byte[] bytes = FileUpload1.FileBytes;
System.Drawing.Image bmp = System.Drawing.Image.FromStream(str);
System.Drawing.Image.GetThumbnailImageAbort myCallback =
new System.Drawing.Image.GetThumbnailImageAbort
                                            (ThumbnailCallback);
int w, h;
w = Math.Min(100, bmp.Width);
h = bmp.Height * w / bmp.Width;
System.Drawing.Image thumb =
           bmp.GetThumbnailImage(w, h, myCallback, IntPtr.Zero);
thumb.Save(Server.MapPath("~/Thumbs/") + filename + ".jpg");
The method requires a callback function, but this can be an empty function,
as follows:
    public bool ThumbnailCallback()
    {
      return false;
    }
So that is it. Put the bits of code into the button handler, add the extra
callback function into the code file and you have a working solution. You can
download this example application.
What next?
There are more sophisticated functions for resizing images, but these will
usually be used for more sophisticated image processing task, where quality and
finer control of parameters are required, e.g. palette optimisation, or pixel
scaling and smoothing methods. One example might be to embed a watermark on
the medium size versions of images, which we may produce for web based browsing.
There are other requirements which may arise in a realistic application. For
example, we might want to allow an administrator or the owner of an image to
edit or delete images and their associated records. Or we may wish to use AJAX
like techniques to make the user interface more responsive or sophisticated.
User authentication is obviously of concern where any database is made
available online, however, this can be handled in ASP.NET independently of the
code in this example.